 | Dock icons are a quick way to bring a hidden window or application to the front so that you can work with it again. Dock icons are odd ducks — they're activated with a single-click. Most icons are selected (highlighted) when you single click and opened when you double-click. So Dock icons are kind of like links on a Web page — you need only a single click to open them. |
You can customize your Dock with favorite applications, a document you update daily, or maybe a folder containing your favorite recipes — use the Dock for anything you need quick access to. Here's how you can add an icon to the Dock or remove a Dock icon you no longer desire.
Adding an icon to the Dock
Adding an application, file, or folder to the Dock is as easy as 1-2-3. First, open a Finder window that contains an application, file, folder, URL, or disk icon that you use frequently. Then follow these steps to add it to the Dock:
1. Click the item you want to add to the Dock.
2. Drag the icon out of the Finder window and onto the Dock, as shown in Figure 1.
3. An icon for this item now appears on the Dock.
Folder, disk, and URL icons must be on the right of the divider line in the Dock; Application icons must be on the left of it.
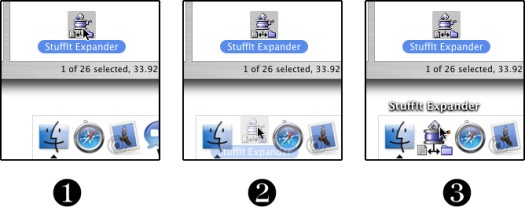
Figure 1: Drag an icon onto the Dock to add it.
| You can add several items at the same time to the Dock by selecting them all and dragging the group to the Dock. However, you can delete only one icon at a time from the Dock. |
Removing an icon from the Dock
To remove an item from the Dock, just drag its icon onto the Desktop. It disappears with a cool poof animation, as shown in Figure 2.

Figure 2: To remove an icon, drag it off the Dock and POOF — it's gone.
By moving an icon out of the Dock, you aren't moving, deleting, or copying the item itself — you're just removing its icon from the Dock. The item is unchanged. Think of it like a library catalog card: Just because you remove the card from the card catalog doesn't mean that the book is gone from the library.
| After you figure out which programs you use and don't use, it's a good idea to relieve overcrowding by removing the ones you never (or rarely) use. |
Knowing what to put in your Dock
Put things on the Dock that you need quick access to and that you use often, or add items that aren't quickly available from menus or the sidebar. If you like using the Dock better than the Finder window sidebar, for example, add your Documents, Movies, Pictures, Music, or even your hard disk to the Dock.
Consider adding these items to your Dock:
- A word-processing application: Most people use word-processing software more than any other application.
- A project folder: You know, the folder that contains all the documents for your thesis, or the biggest project you have at work, or your massive recipe collection . . . whatever. Add that folder to the Dock, and then you can access it much quicker than if you have to open several folders to find it.
|
|
- A special utility or application: You may want to add your favorite graphics application such as Photoshop, or the game you play every afternoon when you think the boss isn't watching.
- Your favorite URLs: Save links to sites that you visit every day — ones that you use in your job, your favorite Mac news sites, or your personalized page from an Internet service provider (ISP). Sure, you can make one of these pages your browser's start page or bookmark it, but the Dock lets you add one or more additional URLs.
|
|
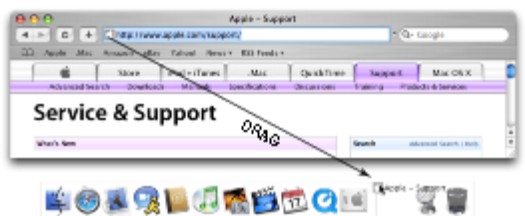
Figure 3: To save a URL to your Dock, drag its little icon from the Address bar to the right side of the Dock.
- You can add several URL icons to the Dock, but bear in mind that the Dock and its icons shrink to accommodate added icons, thus making them harder to see. Perhaps the best idea — if you want easy access to several URLs — is to create a folder full of URLs and put that folder on the Dock. Then you can just press and hold your mouse pointer on the folder (or Control-click the folder) to pop up a menu with all your URLs.
 | Even though you can make the Dock smaller, you're still limited to one row of icons. The smaller you make the Dock, the larger the crowd of icons you can amass. You have to determine for yourself what's best for you: having lots of icons available on the Dock (even though they may be difficult to see because they're so tiny) or having less clutter but fewer icons on your Dock |
No comments:
Post a Comment