A laptop equipped with a wireless networking card can connect to any compatible wireless network. The first step is to find any available networks. The second step is to connect. The final step is to use the network and the goodies it provides
To hunt down a wireless network when Windows Vista is in charge, heed these steps:
1. Choose the Connect To item from the Start menu.
The Connect to a Network window appears. The window lists various things you can connect to. The wireless networks broadcasting within range of your laptop's wireless networking gizmo are shown in the Wireless Network Connection area.
2. Choose a network from the list to highlight it.
3. Click the Connect button.
Windows attempts to "make friendly" with the network.
You may see a warning telling you that the network is unsecured. This message is common for certain free wireless networks that don't require a password for connection. Click the Connect Anyway option to proceed.
4. Enter the network's password, if you're prompted to do so.
5. Choose whether the network is public or private.
This is a vital question. A public network is one that's out in public, one that others (strangers!) can also use. In that situation, you want to ensure that your laptop is locked down and not open to snooping.
A private network is one in your home or office, available only to safe computers or folks you know. Such a network is more open than the public network.
6. Choose whether to save the network's connection information.
Save the information if you plan on using that wireless connection again. That way, you don't have to reenter the password every time you connect (in theory anyway).
7. Click the Close button.
8. Click the Continue button if you're prompted by a User Account Control dialog box.
You're now connected and ready to use the network. A wireless networking icon appears in the notification area on the taskbar, showing that you're connected; point the mouse at that icon for more information.
You may be prompted by various User Account Control warnings. These are okay here because you're modifying the system in order to connect with the wireless network; freely click the Allow button.
The password you enter may not be accepted. If so, you need to manually connect to the network.
Sometimes, it pays to wait a few moments for the wireless connection to sync up (or something). Don't take the lack of an immediate "Connection made, yee-ha!" message as a sign of failure.
The best way to hunt down wireless networks is to use a third-party wireless network browser. Such a program may have come with your laptop's wireless adapter, or it can also be found on the Internet; be sure that your wireless network browser is compatible with Windows Vista.
Wednesday, May 23, 2007
Adding Wireless Keyboards and Mice to Your MacBook
The current crop of Mac laptops arrive at your doorstep in a fully wireless configuration — Apple throws in an internal Bluetooth adapter and an internal AirPort Extreme wireless card. Everything's already included for you. Therefore, you can indeed work keyboard and mouse magic from across the room from your laptop, using a wireless keyboard and mouse. (Or perhaps you just want a full-size keyboard and external mouse to use when you're working from your home or office.)
A number of wireless Bluetooth keyboard/mouse packages are on the market, and any of them should work fine with your Mac. In fact, you can buy Apple's wireless Bluetooth keyboard and mouse separately. Other offerings are available from Logitech and Microsoft.
When shopping for a Bluetooth keyboard/mouse desktop, keep these facts in mind:
Some keyboards are created more than equal. Many of today's third-party keyboards are encrusted with extra function buttons that do everything from opening your email application to searching your kitchen cabinets for another can of spray cheese.
These programmable function keys are neat — they can bring up your favorite applications with a single keystroke while you're relaxing 20 feet away — so look for the keyboard that offers the most programmable keys in your price range.
Rodents crave energy. Does the wireless mouse come with its own recharging stand? If so, that's a big plus. Depending on how much you use your laptop, a mouse that runs on standard batteries can go through a set in as little as a month's time! (Not surprisingly, many computer owners use rechargeable batteries in their wireless mice.) In fact, some wireless mice include an on/off switch to help conserve battery power.
Wireless doesn't always mean Bluetooth. Just because a keyboard or mouse is wireless doesn't automatically make it a Bluetooth device. Plenty of wireless RF (radio frequency) devices are out there, too. These toys need their own transmitters, which are usually USB-based as well, so things can get confusing. Therefore, read the box or technical specifications carefully to make sure that you're buying Bluetooth.
Bluetooth stuff isn't self-cleaning. Sure, your new wireless keyboard and mouse can hang out with you on the sofa, but that doesn't mean they're happy sharing your nacho puffs and grape soda. Look for an optical mouse that doesn't use a ball, and check whether a prospective keyboard can be easily cleaned and maintained before you buy it.
Most Bluetooth devices are controlled through the Bluetooth pane in System Preferences. However, wireless keyboards and mice are a special case because they're monitored through the Bluetooth section of the Keyboard & Mouse pane. (You can even add a new wireless device from this tab.)
Sharing Content on Your Wireless Media Center
With a wireless media center, you can use one computer to store and organize all of your music and video, and then stream that media wirelessly to any location in your home. Before you can access the shared media from either Windows or Mac OS X, you need to configure your setup.
Sharing media with the network from Windows
To share media with the network from Windows, follow these steps:
1. In My Computer or Windows Explorer, right-click the root-level folder in which you store all of your media, and choose Sharing and Security.
If you use a separate hard drive exclusively for storing media, right-click the drive letter in My Computer or Windows Explorer. Do not share an entire hard drive if it contains program files or documents that you don't want to share.
2. Under Network Sharing and Security, select the Share This Folder on the Network check box.
3. Give the folder a share name. Other network computers see this name when they access the shared disk or folder.
Do not select the Allow Network Users to Change My Files option. This prevents others from accidentally deleting your songs and other media.
4. Click OK to apply your changes and close the Properties dialog box.
5. In My Computer or Windows Explorer, make sure that the shared folder or disk has a hand on its icon. The hand indicates that the folder is shared.
Sharing media with the network from Mac OS X
Follow these steps to share media with the network from Mac OS X:
1. Choose Apple --> System Preferences and then open the Sharing icon.
2. Select Personal File Sharing to allow file sharing with other computers.
If you plan to share media with Windows PCs, select Windows Sharing. Then, click the Enable Accounts button and then select the user account or accounts that you want to use when accessing your Mac from a Windows PC.
3. Close System Preferences.
4. Open the Finder, and then browse to the folder containing the media you want to share.
5. Select the folder you want to share and press CMD+I.
6. In the Info dialog box that appears for the folder, click the arrow next to Ownership and Permissions, and then click the arrow next to Details Under Ownership and Permissions.
7. Choose Everyone in the Group menu and then choose Read Only in the Access menu.
8. Click Apply to enclosed items and then close the Info dialog box.
Accessing shared media
Use these steps to access shared media;
1. In Windows, choose Start --> My Network Places.
2. Double-click the network place that contains your media files.
If you don't see the network folder containing your media, click View Workgroup Computers on the left side of the My Network Places window, and then open the icon for the workgroup computer which contains the media. Remember, the media server computer must be on and connected to the network.
3. Open the folder and subfolder containing the media you want to play.
4. To play a song or movie, double-click it.
5. To play multiple files or folder, hold down the Ctrl key and click once on each file or folder that you want to play, and then click Play All or Play Selection under Video Tasks or Audio Tasks on the left side of the window.
When you play music on a Macintosh from a network location, iTunes first copies the song to the local computer before playing it. To change this behavior, open iTunes and choose iTunes --> Preferences. Click Advanced at the top of the Preferences window, and then deselect the Copy files to iTunes Music folder when adding to library option.
Disable power-saving settings on the media server. If the server shuts down its hard drives or goes to sleep after a period of inactivity, other network computers won't be able to access media files stored on the server.
Confounding Wireless Attacks with Cryptography
When the majority of people logged on to networks via modems, hackers created software that automatically had their computer dial thousands of phone numbers in a series; looking for a modem to answer. These software programs were called war dialers. Taking a page from that book, hackers and freeloaders looking for wireless access points now engage in war driving, war walking, and war chalking.
War driving and war walking are simply moving from place to place (like a city's business district) with a laptop equipped with a wireless network card, a strong antenna, and wireless hacking software. They use their laptops to look for corporate and private wireless networks they can log on to. When wireless networks are found, the hackers sometimes leave some war-chalking marks on the sidewalk or the building to indicate the location of a wireless network and other useful information. War chalking is just as it sounds: The hacker uses everyday chalk that can be found in any toy store. The marks are coded symbols. Most people on the streets never notice them and, if they did, have no idea what the symbols mean.
Wireless networks do have some security capabilities, and one of them currently in use is WEP (Wired Equivalent Privacy). Don't stake your life on WEP, though, because it's only an equivalent of security; it isn't real security. WEP encrypts the packets going out over the air. It doesn't encrypt them particularly well, though, and much of the information about the network is sent in the clear. There are many hacker programs available that can crack the basic configurations of WEP, too. AirSnort and WEPCrack are two popular programs. Of course, WEP is much better than using nothing!
Here's a quick and dirty listing of some of the important (and fairly easy) things you can do to make your network less visible to war drivers and to implement WEP or other encryption schemes.
Look for rogue access points
Because wireless access points are very cheap, the temptation for employees to install their own access point is very high. In fact, they may be sitting right on top of the CPU box and you haven't even noticed them. Rogue access points can expose your network to outsiders and circumvent security measures such as firewalls and intrusion detection systems. This is the sort of problem that makes war chalking symbols appear outside buildings.
First, make it a policy that unauthorized access points are a big no-no and installing them is grounds for termination. That lets your staff know that you mean business.
Second, get a war-driving software program and use it yourself to find rogue access points. There are even programs you can easily run on a PDA. One that has received good reports is called WaveRunner. Walking around the office with a PDA is a lot less obtrusive than walking around with a laptop. With a PDA device, your staff may not realize what you're up to. Otherwise they may turn off their access points so you won't find them.
Change the default SSIDs
Although this isn't strictly an encryption technique, changing the default SSIDs can help "hide" your network from casual lookers. The SSID is basically the network name that the wireless access point broadcasts. It's a well-known fact (among hackers, anyway) that vendors often use their company name as the SSID. For example, the company LinkSys uses the SSID of "linksys." It doesn't take a brain surgeon to find networks using the default names. You'll need the access point's manual for instructions on how to change the SSID.
In addition to changing the default SSID you can also disable the "broadcasting" feature of the SSID. The broadcast feature means that the access point is sending out the name of the network to any wireless card that is trying to log on. If you disable this feature, a user will have to manually enter the name of the network and the network card won't find it automatically. The various wireless access point vendors have different methods of accomplishing this task, so you'll have to refer to your user's manual to see how to make these changes.
Turn on WEP
You have to do more than just turn on WEP; you also have to check a box that says something like "make WEP required." That ensures that WEP must be enabled on all desktop and laptop computers, too. Again, refer to your user's manual to figure out how your system handles this.
It's important to change the default keys for WEP on your system. You'll need to refer to your manual again. In any case, when you've changed the keys, you have to go around to all the desktop and laptop computers and manually enter those same keys into those computers.
Always use the strongest encryption possible. As of this writing it's 128-bit encryption. You'll have to make sure that all the wireless network cards in your computers are able to handle that level of encryption as some of the older ones were limited to a using a much smaller key size. If your systems can handle it, it doesn't cost you anything to use the strongest encryption, so why waste your time with weaker encryption? Even with WEP cracking tools, it would take a hacker quite a bit longer to figure out 128-bit keys. He may just move on to an easier target and leave your system alone.
Position your access points well
If you install your access points near windows and walls, you can be sure that the wireless signals "leak" to the outside and can be found by others. The best thing to do is to locate the access points as close to the center of the building as possible. Position your access points so people outside the building can't find the signals; however, your staff inside the office do need to be able to find the signals. If you place the access point too securely (like behind steel doors), no one will be able to log on.
Buy special antennas
Yes! You can buy special antennas that will shield and/or shape the wireless signals. With these antennas on your access points, you can direct the signals, limit them to certain areas, and shield them from walls, windows, and doors. Check with your local electronics store and try talking to some of your local ham radio enthusiasts. Ham radio operators usually know more about radio waves and tuning antennas than you ever thought possible.
Use a VPN for wireless networks
VPNs are much better at authentication and encryption than WEP. If you already have VPNs set up for the rest of your network, it's not much of a chore to set it up for wireless networks. Just make sure your access points are all behind your firewall and then set up your VPN scheme. You can be guaranteed of better authentication and much better encryption that way.
Have any queries feel free to mail me
david.singh@verizon.net
Wireless Audio Systemes
Perhaps building a whole-home audio network is not high on your list of priorities, or you don't have an opportunity to run wires while the walls are unfinished. The most popular way of getting audio around the house without a dedicated network is with an RF wireless system. These come in two main flavors:
* Wireless speaker systems connect to the line-level outputs of a source device or preamplifier and send the signal over a 900-MHz or 2.4-GHz channel to a pair of self-amplified stereo speakers.
* Wireless line-level distribution systems hook up to your source components in the same fashion but send their signal to a receiver that hooks into your own amplifier and speakers on the far end.
One major potential difficulty with this sort of wireless system is that it uses a line-level input — something that most source devices have only one of. So you may run into trouble hooking up a CD player, for example, to both a receiver (or amp) for local listening and to one of these devices for remote listening. Luckily, many of these units also accept the output of your receiver or amp's headphone jack, so you can avoid this problem if you have a headphone jack available. Alternately, you can use Y-splitter audio cables.
Major manufacturers of wireless audio systems include:
* Recoton
* RCA
* RF Link
Another cool wireless product comes from X10 Wireless Technologies. Their MP3 Anywhere system works like the other systems, but it's available with X10's BOOM 2000 software. This software runs on your Windows PC and let's you remotely control and access the PC's MP3 music files, as well as CDs or DVDs played back in the PC's internal drive.
Wi-Fi (the wireless computer networking technology) is popular because it allows people to roam with laptop computers anywhere in the house, staying connected to the Internet without wires. Computers are also becoming an essential source of music (using stored MP3 files or streaming audio over an Internet connection).
Computer manufacturers have been paying attention to these trends and are coming up with new products to bring them together. In particular, Intel has announced products that use Wi-Fi to send PC-based digital audio signals over a Wi-Fi wireless network to a small device that plugs into your audio system. These devices (called Digital Media Adapters) will contain the necessary computer hardware to convert digital signals into analog audio signals that can connect to an audio receiver or to the control amplifier of your whole-home audio system.
Have any queries feel free to mail me
david.singh@verizon.net
Windows XP Timesaving Technique: Running the Wireless Network Setup Wizard
Windows XP Service Pack 2 has a lot of nifty new features, and one of the best is the wizard that helps you configure your wireless network. You need a USB flash drive or a USB flash card reader, and a free USB port on every computer attached to the wireless network.
If your wireless broadband router, wireless access point, or other wireless base station has a USB port and it supports Windows Smart Network Key, you're in luck: The wizard can configure your entire network in a matter of minutes. If your router doesn't support WSNK, not to worry — entering the requisite codes by hand is pretty easy.
Setting up the network
Here's how to get your wireless network secure:
1. Choose Start --> All Programs --> Accessories --> Communications --> Wireless Network Setup Wizard.
The wizard shows its splash screen.
2. Click Next.
The wizard asks you to type in a name for your network.
3. Type a name for the network.
The name of the network is used for the wireless router's SSID (Service Set Identifier), which the wireless box typically broadcasts to make it easy to connect. The SSID is the name that appears when you try to connect to a wireless network. Each wireless router has a default SSID: tsunami, wireless, and linksys are all common default SSIDs.
4. Unless you already have a network key that you absolutely must use, select the Automatically Assign a Network Key radio button.
5. If your wireless base station and all the wireless cards on your network support WPA (if you have 802.11g, they may or may not; with 802.11b, it's unlikely), check the Use WPA Encryption box.
There is a performance hit for using either WEP or WPA encryption. Your network will run slower — but your neighbor won't be able to look at your files. Fair trade, eh?
6. Click Next.
Behind the scenes, the wizard generates all the information it needs to set up a secure wireless network.
The wizard asks if it can use a "key drive" (USB flash drive) to set up the network.
7. Select the Use a USB Flash Drive radio button.
Select this button if you meet the following requirements:
• You have a key drive (USB flash drive) handy
• A free USB port is on every computer on your network
• All of the computers on your network are running Windows XP Service Pack 2 or later
• Your wireless router has a USB port and it understands WSNK (check the manual)
If you don't meet those requirements, then select the Set Up a Network Manually radio button. Then click Next.
• If you click the first button, the wizard takes you through the steps to transfer the settings to all the other computers on the network, as well as the wireless base station. Basically, you schlep the key drive to all the PCs, and they set themselves up.
• If your hardware isn't quite up to the Dick Tracy stage yet, the wizard shows you its final instructions.
8. Click Print Network Settings.
The wizard doesn't actually print them. Instead, it opens Notepad and sticks the relevant settings in a new text file.
9. Print the text file and follow the instructions to transfer the settings to each of your wireless devices manually.
It isn't as bad as it looks. See the next section.
Making manual changes
So you're stuck with entering wireless network security information by hand. Be of good cheer. The Wireless Network Setup Wizard (see the preceding section) does all the heavy lifting. If you're running Windows XP Service Pack 2 or later, it's pretty easy:
1. Enter the new settings in your wireless router or access point.
Unfortunately, each one is different. You may have to dig into the router's manual. Usually, once you get inside the router, making the changes is easy. The key you need to enter is the one that was generated by the Wireless Network Setup Wizard.
2. Make sure you update/apply/save the changes to the wireless router before leaving.
Many routers require you to save the changes manually, so they'll be around if the electricity goes out.
3. Choose Start --> All Programs --> Accessories --> Communications --> Wireless Network Setup Wizard.
You see that really confusing splash screen again.
4. Click Next.
The wizard asks for a network name.
5. Type the network name precisely the same way that it appears in the printout from the preceding section.
6. Select the Manually Assign a Network Key radio button and click Next.
The wizard asks you to type the key.
7. Click Next.
You end up at Step 7 in the preceding section, from which point you can print your settings or just close down the wizard.
8. Repeat Steps 3 through 8 on each computer in your wireless network.
The result: a very secure wireless network that works like a-ringin' a bell
Tuesday, May 22, 2007
Monitoring Wireless Networks for better Performence
If you want to keep your wireless network running fast and efficient, you_ need to continuously monitor its performance. The speed of a Wi-Fi (Wireless Fidelity) network is measured in megabits per second, or Mbps. Ideally, your Wi-Fi gear should be running at 54 Mbps — the speed of 802.11g Wi-Fi gear — or better. However, some components may cause your network to slow down to 802.11b speed, which is 11 Mbps. At this slower speed, transferring files takes longer, multimedia plays poorly, and downloading email and Web pages takes longer.
Reviewing wireless bandwidth statistics
Follow these steps to view wireless bandwidth statistics:
1. Log in to your access point using a Web browser.
2. Locate the traffic statistics screen in the access point's control panel. Look for a Traffic or Stats button or link.
3. Review statistics for the wireless portion of your network and compare it to other network traffic.
WAN stands for wide area network, and LAN stands for local area network. The WAN is usually your Internet connection, and the LAN is your local network. LAN traffic includes wireless traffic, so if you don't have any Ethernet wired computers the LAN and wireless statistics should be about the same.
 | Reset the counters and then check them 24 hours later. Do this on a regular basis to get an idea of your normal daily bandwidth. An abnormal surge in wireless traffic may indicate that an unauthorized user is on your network. |
4. Locate the list of wireless clients and make sure that each device belongs to you. Even if all of the devices belong to you, disabling unused wireless devices (such as game consoles or printers that are not currently in use) can help speed up your network.
Receiving router logs by email
Use these steps to receive router logs via email:
1. Log in to the router's control panel using a Web browser.
2. Open the Logs screen of the router control panel and click the Log Settings button or link.
3. In the log settings, select the type of information you want emailed to you.
4. Enter the SMTP Server for outgoing mail and your email address and click OK or Apply.
| You can obtain the address for your SMTP mail server from your ISP. |
Identifying computers on your network
Follow these steps to identify the computers on your network:
1. Log in to the router's control panel using a Web browser.
2. Open the DHCP screen in the router control panel and locate the list of DHCP clients.
3. Note how many computers are using your network.
 | Each computer on your network must have a unique IP address, which is assigned by the router's DHCP server. The DHCP client list includes computers currently or recently active on your network. |
Determining a Windows PC's IP address
Follow these steps to locate an IP address in Windows:
1. Choose Start --> All Programs --> Accessories --> Communication --> Network Connections.
2. In the resulting Network Connections window, click your current network connection once to select it.
3. Note the IP address and other information under Details on the left side of the Network Connections window.
| If you have an older version of Windows, open the MS-DOS Command Prompt from the Windows Start menu. At the command prompt, type IPCONFIG and press Enter. The computer's IP address and other network information will be listed in the Command Prompt window. |
Determining a Mac's IP address
Use these steps to find a Mac's IP address:
1. Open System Preferences from the Apple menu.
2. Click the Network icon in the System Preferences window.
3. Select your current network connection in the Show menu, and then note the IP address that is listed.
Determining a Pocket PC's IP address
Follow these steps to locate an IP address for a Pocket PC:
1. Tap the Wi-Fi connection icon on the Pocket PC's Today screen.
2. In the wireless LAN utility, tap the Advanced tab and note the IP address listed there.
Checking the speed of a wireless PC
To check the speed of a wireless PC, follow these step:
1. Double-click the system tray icon for your wireless connection.
| The Windows system tray is in the lower-right corner next to the clock. If you don't have a system tray icon for your wireless connection, choose Start --> All Programs --> Accessories --> Communications --> Network Connections and then double-click the listing for your wireless network connection. |
2. Note the speed shown for the connection.
Measuring your Wi-Fi range
Follow these steps to measure the Wi-Fi range for your network device:
1. Open the status window for your wireless connection. (If you're using a Pocket PC, open the Config tab of the_ wireless LAN utility.)
2. Move the computer to different locations and note the signal strength.
3. In Windows, right-click the wireless connection icon in the system tray to see the Wi-Fi signal strength.
Geographic distance isn't the only factor that affects the range of your Wi-Fi network. Brick walls, heavy furniture, and other objects can create additional interference. Just because the signal strength is poor in your living room doesn't mean that a neighbor two houses away can't receive your network's signal.
| Some Wi-Fi antennas are stronger than others. If you have more than one wireless computer, test your Wi-Fi range using every device, noting which unit seems to get the best reception. Use the unit with the best reception to test the range of your network |
Have any queries feel free to mail me
david.singh@verizon.net
Improving wireless signals and the Speed and Range of Your Network
Wireless networks make it easier to use technology throughout your home or small office. However, you may find that your wireless network doesn't perform quite as well as you'd hoped. Performance problems with wireless networks can usually be divided into two categories: speed and range. You can improve the speed and range of your wireless network by avoiding interference, using high-gain antennas, and using special devices designed specifically to boost Wi-Fi range.
Identifying Wi-Fi bottlenecks
Follow these steps to identify Wi-Fi bottlenecks:
1. Check the documentation or labeling for wireless devices to make sure that they are compatible with the 802.11g Wi-Fi standard.
2. Open wireless networking utilities on suspect devices and check the transmission rate (see Figure 1).
In Figure 1, the Tx Rate is 11Mbps, which is the speed of 802.11b network gear. If this device is only compatible with 802.11b, installing it could cause your entire network to slow down to 802.11b speeds.
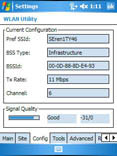
Figure 1: This device is networking at 802.11b speeds.
3. Disable 802.11b gear when maximum Wi-Fi speed is needed.
Adjusting access point speed settings
Use these steps to adjust the speed settings of your access point:
1. Log in to your access point using a Web browser.
2. Locate the performance controls.
3. Select the Enabled radio button by the 802.11g Only Mode option and click OK or Apply.
| Adjusting this setting forces your wireless network to perform at the faster 802.11g speed, but 802.11b gear may be unable to access the network. |
Networking faster than the speed of G
Belkin, D-Link, Linksys, Netgear, and most other manufacturers of Wi-Fi gear offer accelerator technology that allows connections even faster than 802.11g gear. However, these accelerator technologies are usually proprietary, which means that to actually use the higher speeds the access point and all Wi-Fi adapters must be of the same brand and have the same accelerator technology.
Follow these steps to allow connections faster than 802.11g:
1. Purchase an access point and wireless adapters that use the same wireless acceleration technology.
2. Log in to the access point's control panel and enable the accelerator technology (refer to Figure 2).
3. Launch the wireless adapter software on the client computer.
| It is usually necessary to use the adapter's proprietary software to take advantage of acceleration technology. The Windows wireless connection manager can only manage 802.11a/b/g networks. |
4. Make sure that the client software uses the same acceleration settings as the access point.
Positioning the access point for best range
Use these steps when positioning your access point:
1. Choose a location that is central to your wireless clients.
2. Mount the access point high and away from obstructions.
| Try to mount the access point away from heavy furniture and other large obstacles. Avoid placing the access points near brick, cement, or plaster walls. Windows, mirrors, and other reflective surfaces can also reduce signal range. |
Eliminating Wi-Fi interference
Follow these steps to help eliminate Wi-Fi interference:
1. Do not position the access point near appliances that cause interference on the 2.4 GHz band, such as microwaves and baby monitors.
2. Try to use cordless phones that use the 900 MHz or 5.8 GHz bands.
3. Separate Bluetooth and Wi-Fi gear, if possible. Bluetooth signals can cause minor inference with 802.11b/g gear.
Adding a range extending antenna to your access point
Use the following steps to add a range extending antenna to the access point:
1. Choose a directional or omni-directional antenna.
Directional antennas can be aimed to concentrate the range in a specific direction. Omni-directional antennas increase range in any direction.
2. Connect the antenna to your access point.
3. If you have a directional antenna, point it in the direction where you want to most boost your Wi-Fi range.
Using a high gain antenna with a Wi-Fi adapter
To use a high gain antenna with a Wi-Fi adapter, follow these steps:
1. Obtain an antenna that is compatible with your Wi-Fi adapter.
2. Connect the high gain antenna to the adapter.
3. Position the antenna as high as possible for best reception.
| Generally speaking, you can only add a high gain antenna to a Wi-Fi adapter if the adapter has a removable antenna. USB and cardbus adapters usually do not have removable antennas, but PCI card Wi-Fi adapters usually do have removable antennas. |
Increasing range with a Wi-Fi repeater
Follow these steps to use a Wi-Fi repeater to increase the range:
1. Obtain a Wi-Fi repeater or range extender.
2. Use an Ethernet cable to connect the repeater to your router/access point, or directly to a computer.
3. Log in to the repeater's control panel using a Web browser, just as you would log in to your regular access point.
4. Configure the repeater to use the same SSID and encryption settings as your regular access point.
5. After configuration is complete, disconnect the Ethernet cable and position the repeater about halfway between the access point and the most distant computer.
| When positioning a repeater, it must be within range of your regular access point. |
Have any queries feel free to mail me
david.singh@verizon.net
Configuring DNS
 | The Active Directory Installation wizard offers to install DNS if the wizard does not detect a proper DNS zone configuration during the installation of Active Directory. However, you should not rely on the wizard for these tasks. Many bug reports have been submitted regarding installation bases that relied on the wizard. Also keep in mind that the Active Directory Installation wizard does not install a reverse lookup zone. |
The Windows 2000 DNS service can coexist with or migrate other DNS services, including the popular Berkeley Internet Name Domain (BIND) DNS service. One great place to find BIND information is the Internet Software Consortium Web site. To migrate from BIND, you must transfer the BIND zone and boot files to the Microsoft DNS service.
Windows 2000 DNS can also upgrade or coexist with Windows NT 4.0 DNS servers.
For the exam, you should know how to configure DNS for Active Directory. Here is the procedure.
1. Click Start --> Settings --> Control Panel.
2. Double-click Add/Remove Programs and then click Add/Remove Windows Components.
3. In Components, select Networking Services and then click Details.
4. In Subcomponents of Networking Services, select the Domain Name System (DNS) check box, click OK, and then click Next.
5. In Copy Files From, type the full path to the Windows 2000 distribution files and then click OK.
To host Active Directory, you must properly configure DNS with a zone for the Active Directory namespace. You should create both zone types for a proper DNS implementation for your Active Directory namespace — that is, a forward lookup zone and a reverse lookup zone. Read on to discover how.
Creating a forward lookup zone
To create a forward lookup zone:
1. Click Start --> Programs --> Administrative Tools --> DNS.
Windows 2000 launches the DNS Microsoft Management Console, from which you can perform your DNS administration.
2. Expand the DNS server.
3. Right-click the Forward Lookup Zone folder and choose New Zone.
4. Click Next to continue when the New Zone wizard appears.
The wizard takes the pain out of DNS administration.
5. Ensure that Standard Primary is selected and click Next.
6. Ensure that Forward Lookup Zone is selected and click Next.
7. At the New Zone page, type the name of your zone (for example, fordummies.com) and click Next.
8. Select Create a New File With This File Name and click Next.
9. Click Finish.
Creating a reverse lookup zone
To create a reverse lookup zone:
1. Click Start --> Programs --> Administrative Tools --> DNS.
2. Expand the DNS server.
3. Right-click your server and choose New Zone.
4. Click Next to continue when the New Zone wizard appears.
5. Ensure that Standard Primary is selected and click Next.
6. Ensure that Reverse Lookup Zone is selected and click Next.
7. Ensure that Network ID is selected, type your network ID in the Network ID field, and click Next.
8. Select Create a New File With This File Name and click Next.
9. Click Finish.
As far as Active Directory is concerned, your DNS server is almost ready. You should now configure the forward and reverse lookup zones for dynamic updating so that you do not get stuck creating all the records required for Active Directory yourself!
Have any queries feel free to mail me
david.singh@verizon.net
Monday, May 21, 2007
Installing DHCP
If you have worked with Windows NT at all, you are probably familiar with Dynamic Host Configuration Protocol (DHCP) — a server service that enables the server to dynamically assign IP addresses to network clients. Because Windows 2000 networking has TCP/IP as its foundation, DHCP also plays an important role in Windows 2000 networks.
| For the exam, you need to know how to install and configure DHCP on a Windows 2000 server, as well as how to manage its operations. |
What is DHCP, anyway?
DHCP (Dynamic Host Configuration Protocol) is a server service that dynamically assigns, or leases, IP addresses and related IP information to network clients. At first glance, this may not seem like an important task. However, you have to remember that, on a TCP/IP network, each network client must have a unique IP address and an appropriate subnet mask. Without these items, a client cannot communicate on the network. For example, if two clients have the same IP address, neither will be able to communicate on the network.
Back in its early days, TCP/IP gained the reputation of being a high-overhead protocol — it required more configuration than other networking protocols. The prospect of having to visit each client machine and manually enter a correct IP address and subnet mask without making a duplication error was enough to give network administrators severe panic attacks.
DHCP handles all this work automatically. Each client gets a unique IP address, subnet mask, and other IP information such as default gateways and the IP addresses of WINS (Windows Internet Name Service) and DNS (Domain Name System) servers. DHCP makes certain that no clients have duplicate addresses, and this entire process is invisible to network administrators and network users. As you can see, DHCP is very important, and the exam expects you to know how to install and configure it.
How does DHCP work?
DHCP works by leasing IP addresses and IP information to network clients for a period of time. For the lease to happen, the following negotiation process occurs:
1. During the boot process, a client computer that is configured as a DHCP client sends out a broadcast packet called DHCPDISCOVER. This Discover packet contains the client's computer name and Media Access Control (MAC) address so the DHCP servers can respond to it. Basically, the Discover packet says, "I'm looking for a DHCP server who can lease an IP address."
2. DHCP servers on the network respond to the broadcast with a DHCPOFFER. In essence, the DHCPOFFER says, "I am a DHCP server and I have a lease for you." If several DHCP servers respond to the request, the client accepts the first offer that it receives.
3. The client responds via a broadcast message called a DHCPREQUEST. This message basically says, "I accept your lease offer and would like an IP address." If other DHCP servers made offers, they also see their lease offers were not accepted by the broadcast message, so they rescind their offers. (They must not like getting snubbed by a client computer.)
4. The DHCP server whose offer was accepted responds with a DHCPACK message, which acknowledges the lease acceptance and contains the client's IP address lease as well as other IP addressing information that you configure the server to provide. The client is now a TCP/IP client and can participate on the network.
| Keep in mind that a lease is for a period of time. Typically, a client can keep its IP address for several days (or whatever you configure). When half the lease time expires, the client attempts to renew its lease for the IP address. After a client obtains the lease for an IP address, it attempts to keep the lease by renewing it over and over. If unsuccessful, the client simply must get a new IP address lease. |
Reviewing important DHCP terms
You should memorize the DHCP terms listed in Table 1, because you need to know them for the exam.
Table 1: Important DHCP Terms
DHCP Term | What It Means |
Scope | A full range of IP addresses that can be leased from a particular DHCP server. |
Superscope | A grouping of scopes used to support logical IP subnets that exist on one physical IP subnet (called a multinet). |
Multicast Scope | A scope that contains multicast IP addresses, which treat multicast clients as a group. Multicast is an extension of DHCP and uses a multicast address range of 224.0.0.0 to 239.255.255.255. |
Address Pool | The IP addresses in a scope that are available for lease. |
Exclusion Range | A group of IP address in the scope that are excluded from leasing. Excluded addresses are normally used to give hardware devices, such as routers, a static IP address. |
Reservation | A means for assigning a permanent IP address to a particular client, server, or hardware device. Reservations are typically made for servers or hardware devices that need a static IP address. |
Lease | The amount of time that a client may use an IP address before the client must re-lease the IP address or request another one. |
Installing DHCP
As with other networking components in Windows 2000 Server, you can install DHCP in either of two ways:
- Using Add/Remove Programs in the Control Panel
- Using the Configure Your Server tool
| Like most other Windows 2000 components, DHCP functions as a Microsoft Management Console (MMC) snap-in. After you install DHCP, you must configure the service for operation. |
To open the DHCP Manager, click Start --> Programs --> Administrative Tools --> DHCP. The right pane within the snap-in tells you that you must configure the service.
| DHCP does not begin leasing IP addresses and it is not functional until an administrator configures it. |
Have any queries feel free to mail me
david.singh@verizon.net
Adding MAC into Windows Networking
One scenario you may encounter in a home network is the need to connect a Macintosh computer to a non-Apple-based network. If you're running OS X on your Mac, it can join your network easily, with no add-ons or extra software required.
Getting on a Windows network
To connect to your Windows PCs or file servers, simply go the OS X Finder and then select Go --> Connect to Server (Command-K). In the dialog box that appears, you can type the IP address or host name of the server you're connecting to and then click the Connect button. Alternatively, click the Browse button in the dialog box to search your local network for available servers and shares.
For earlier versions of Mac operating systems, you need to buy software to allow you to include your Mac. You can buy software for the PCs or software for the Macintosh. (You don't need it for both.) Check with magazines and books that are devoted to Macintosh users to find out about software for incorporating your older Macintosh into your network. Two of those programs are described next.
Mac, meet Dave
For the Macintosh, buy Dave. Yep, that's the name of the software. It's from Thursby software, which you can reach at Thursby.com.
This software uses TCP/IP on the Mac, so your PCs can recognize and interact with the Mac. In effect, it makes the Macintosh look like a PC to the other PCs that are on the network. Macintosh purists (sometimes regarded as a cultlike group) may not love that description. It even lets the Mac user log on to the network the way PC users do.
You must be using a Mac with a 68030 or higher processor, and you must have at least 16 MB of RAM. The software supports Mac OS 8.6 and higher. You can download a free trial, which is a limited version of the software, before deciding to purchase it.
The company also has a product called MacSOHO that has fewer features but does support file sharing between Macs and PCs. You may want to investigate it.
From a PC LAN to a PC MACLAN
Miramar Systems, at Thursby.com, offers a product called PC MACLAN, which is installed on PCs that need to interact with Macintosh computers (the software adds the AppleTalk protocol to the PC).
PC MACLAN comes in two versions: one for Windows 95/98/Me and another for Windows NT/2000/XP.
Troubleshooting tips for password issues on a wireless connection
If you have trouble getting your Macintosh up and running on your Windows-based wireless network, it almost certainly relates to the network password. Here are a few troubleshooting tips to resolve password issues:
- Try turning off encryption on the wireless network. If you can successfully connect your Mac to the network without the need of a password, you can be sure that the password was the problem. Don't leave the network unprotected, however. Read on.
- Check the password configuration. When you turn on the access point's encryption, determine whether the password is an alphanumeric value or a hexadecimal number. Some hardware vendors provide configuration software that has you enter a pass phrase, but the software then generates a hexadecimal number. If you're using AirPort networking software on your Mac, you have to enter the hexadecimal number, not the pass phrase.
- Watch for case-sensitivity. If the Windows-based access point configuration software enables you to enter an alphanumeric password, keep in mind that the password is case sensitive. For WEP, the password should be either exactly 5 characters (letters and numbers) for 64-bit encryption or 13 characters for 128-bit encryption. You should then enter exactly the same characters in the Password text box in the AirPort pane of Internet Connect.
- Use current software. Make sure that you're using the most current version of AirPort software. The most up-to-date software makes it easier to enter passwords connecting to a Windows-based wireless network. The new software automatically distinguishes between alphanumeric and hexadecimal passwords. With earlier versions of the software, to connect to a WEP-encrypted Windows-based network, you have to type quotation marks around alphanumeric values and type a $ in front of hexadecimal numbers.
Have any queries feel free to mail me
david.singh@verizon.net
Assembling a Wireless Roaming Network with Airport
When a single AirPort Base Station can't cover the area that you want your wireless network to span — either because of interference, physical obstacles, area size, or a combination of these — you may have to get one or more additional AirPort Base Stations to extend the range of your network. After you have several base stations in play, you can use them to extend the network in several ways. A roaming network is one of those ways.
Understanding roaming networks
In a roaming network, as a client computer moves out of the broadcast range of one base station and into the range of another, the computer remains connected to the network. The client computer locks onto the signal of the strongest base station in the area, similar to the way a cell phone keeps its connection as it moves out of range of one cell tower, into another. Roaming networks, as their name implies, are designed with the peripatetic habits of mobile computer users in mind.
| Roaming networks require that each base station in the network have a physical connection to the other. That means you can't just place the base stations anywhere you want: You must place them where they can connect to each other through a wired LAN. Roaming networks are thus well-suited to situations where a wired LAN already exists, and the AirPort Base Stations are used to extend that LAN to wireless computer users. You might, for example, find roaming networks in a business setting, where a LAN already connects a suite of offices, or in a school where a LAN already connects neighboring classrooms. |
A roaming network can share an Internet connection to its clients just as an individual base station can. But it doesn't have to: You can choose to establish a roaming network that remains isolated from the rest of the networked world. For example, a roaming network can connect the wireless computers toted around by salespeople at a car dealership, the wired computers used by the dealership's office staff, and the dealership's customer database and inventory tracking system. Nothing, in terms of data transmission, leaves the lot.
Setting up base stations in a roaming network
You don't need to do anything exotic with your AirPort Base Station to assemble a roaming network. Here's what you need to do to configure the AirPort Base Stations that you use to create your roaming network:
1. Connect each AirPort Base Station to the LAN.
Use the LAN Ethernet port if you have a Snow or AirPort Extreme base station. For a Graphite or AirPort Express, you have only one Ethernet port, so use it.
2. Open the AirPort Admin Utility.
You will perform the following steps for each base station that forms your roaming LAN.
3. In the AirPort Admin Utility, in the Select a Base Station window, select a base station.
4. Click Configure.
5. Click the AirPort tab.
6. Give the base station a network name and network password.
For every base station you configure, you will use the same network name and password.
By assigning the same network name and password to the network, the roaming computer regards the signals coming from each base station as all being from the same network.
| When you set the network password for each AirPort Base Station, you should also make sure that each base station uses the same security protocol. |
7. Under the Network tab, turn off Distribute IP Addresses.
Different model base stations may have some slightly different options under this Network tab. For example, an AirPort Extreme base station always provides a bridge between the wireless part of the network and the wired LAN, and a Graphite base station has an Enable AirPort to Ethernet bridging check box that enables this bridging. In a roaming network you want to have such bridging available, so if your base station provides this check box under the AirPort Admin Utility's Network tab, put a check in it.
8. Set the channel.
| To avoid possible interference between adjacent AirPort Base Stations on your roaming network, try to arrange things so that neighboring base stations have channel settings several channels apart. For example, if you set a base station in your roaming network to channel 1, set that station's closest neighbor to channel 4 or higher. Because stations in a roaming network tend to be spaced relatively far apart, you don't have to set their channel numbers to the optimal five channel separation. |
9. Click Update.
10. Repeat Steps 3 through 9 for each base station you are configuring on the roaming network.
These steps create a roaming network that extends a wired LAN to wireless computers.
Have any queries feel free to mail me
david.singh@verizon.net
Blocking Unauthorized Users to Your Wi-Fi Devices
If you know the MAC address for an unauthorized user who is accessing your network, you can block the user from your network's router or use a security program to restrict access. Although blocking an intruder using an Internet security program installed on a specific computer does protect the data on that computer, it does not block the intruder from the rest of your network.
Blocking a user from the router
Use the following steps to block a user from your network's router:
1. Log in to the control panel for your WAP (Wireless Access Point) using a Web browser.
2. Locate the filter controls and select MAC filters (see Figure 1).
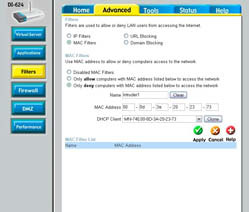
Figure 1: Filter unauthorized MAC addresses from your network.
3. Select the Only Deny Computers option to create a MAC filter that will deny access to a specific MAC address.
4. Enter a name for the rule, and enter the MAC address for the unwanted device.
5. Click OK or Apply to save your changes. The new MAC filter appears in your list of MAC filters, as shown in Figure 2.
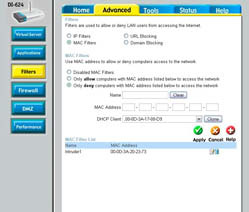
Figure 2: The MAC filter now appears in your list of filters.
6. Double-check that SSID broadcast is disabled in your access point.
| Disable SSID broadcast before you change the SSID and other network security keys as described in the following step. |
7. Change the SSID, WEP key, WPA-PSK passphrase, and administrator password for your access point.
| You should change the SSID and all security keys in your wireless devices any time you even suspect that your network has had an unauthorized intrusion. Although MAC filtering creates a roadblock for the intruder, diligent intruders can get around that roadblock either by MAC address spoofing, or by simply using a different computer. |
Blocking a user with a security program
Follow these steps to use a security program to block a user:
1. Open your Internet security program, open the Wi-Fi detection screen used for detecting computers on your network, and find local computers.
2. Select the computer you want to restrict and click Properties.
3. Block access from the offending computer. In Trend Micro's Internet security program, click the Add Exception button to block the computer.
Have any queries feel free to mail me
david.singh@verizon.net
Cleaning Windows XP in a Networked Environment
If you have a computer connected to a network, it's possible that other network users could traipse through your system at all hours of the day or night. These users may leave things behind, adding to the general clutter and making your cleaning job even more challenging.
Deleting local system user accounts
Windows XP is a multiuser system, which means that multiple people can use the same computer. This lets you set up accounts for different coworkers or family members.
Each user can add programs and create unshared files. If a user no longer needs an account on your system, his programs and files take up hard drive space that you may want to reclaim. To reclaim that space, remove the user's account by following these steps:
1. Restart your system and log in as system administrator.
Windows XP created an administrator account for your system when it was set up. Since only the administrator can delete users, you need to use that account. (If your personal account was set up with administrator's rights, you can delete users when logged in under your own account. To determine whether you can do this, try. If you can't delete them, then you must log in as the administrator.)
2. Choose Start --> Control Panel --> User Accounts --> User Accounts.
If you're using the Classic view of the Control Panel, you need only click User Accounts once.
Windows displays a dialog box containing all the user accounts, along with some tasks you can perform.
3. Click the user account you want to delete.
Windows displays a list of tasks you can perform in relation to the account.
4. Click Delete the Account.
Windows asks you if you want to keep the files associated with the account.
5. Click Delete Files.
Windows deletes the files. Deleting can take a while, depending on how many files were created using the account.
6. Click Delete Account.
Windows finishes deleting the specified account.
| Restart your computer after completing these steps. You don't want to stay logged in as administrator and inadvertently change other settings. |
Moving frequently accessed data
Your home has areas accessible to different people in the family. If you want something to be accessible to everyone, you can place it in the middle of the living room or on a kitchen counter. If you want it to be more private, you can place it in your bedroom closet or in a closed-off area of your home office.
Your computer is the same way — you probably have data that you use for your programs. Others don't need to access that data. Conversely, some of your data may have wide appeal.
If you have data that others need, perform the digital equivalent of moving it from the bedroom closet to the middle of the living room. You do that by either setting up a shared folder on your system or moving the data to a shared drive accessible through your network. Moving the data to a network drive can help free up space on your local hard drive, which is a good thing.
| Don't keep a private copy of data that others can change. Doing so, you run into data synchronization problems. If a coworker changes the public copy of the data file, that change isn't reflected in your private copy. Likewise, if you change the private copy, it doesn't show up in the public copy. Before long, lots of discrepancies exist between the two file versions. Solve the problem by making sure only a single copy of the data file exists. |
Removing shared folders
Windows allows you to share data with other people on your network. It doesn't allow you to share individual files but entire directories. In other words, you aren't sharing documents, but the containers (folders) in which the documents are stored.
When you share folders on your system, people can read data from the folder and sometimes store information there. Allowing others to access data on your system can slow down your system; allowing others to place data on your system can encourage clutter. You can reduce clutter (and perhaps increase system performance) by unsharing the previously shared folder. Just follow these steps:
1. Display the folder window containing the folder you no longer want to share.
You can use My Computer or Windows Explorer to display the folder. The icon for the intended folder should be shown with an outstretched hand holding the folder.
2. Right-click the folder icon and choose Sharing and Security from the context menu.
Windows displays the folder's Properties dialog box, with the Sharing tab. Another way to display this dialog box is by choosing Properties from the context menu and then clicking the Sharing tab.
3. In the Network Sharing and Security area, deselect the Share This Folder on the Network check box.
4. Click OK.
The folder is immediately inaccessible to others. If someone is actively using data in the folder, you may see a dialog box warning you that someone else is using your data. If you want to cut off the user's access to your data, then click OK.
| Cutting off another user while she has a file open on your system can result in a corrupted data file. If possible, get the other person to exit the application (thereby closing the data file) before cutting off access. |
Cutting your system off the network
Just because Windows allows you to share your local resources (files and printers) on a network doesn't mean you have to share them. If you want to keep your resources to yourself, you can disable sharing all together by following these steps:
1. Choose Start --> Control Panel --> Network and Internet Connections --> Network Connections.
If you're using the Classic view of the Control Panel, choose Start --> Control Panel --> Network Connections instead. In either case, you see icons representing the different connections defined on your system.
2. Right-click the connection for your network and choose Properties from the context menu.
Windows displays the connection's Properties dialog box.
3. Deselect the check box next to File and Printer Sharing for Microsoft Networks.
This network component controls whether resources on your system are sharable with others.
4. Click OK.
After you disable file and printer sharing, nobody can utilize resources on your system. Cutting off others won't stop you from using resources on their systems, if they're sharing.
| If you don't foresee a time when you'll ever share system resources with others, then you may want to uninstall the sharing component from your network. In the Properties dialog box, select the File and Printer Sharing for Microsoft Networks component and click Uninstall. The component is removed entirely from the operating system. If you later change your mind, you can reinstall the component by clicking Install and choose File and Printer Sharing for Microsoft Networks from the Services area. |
Have any queries feel free to mail me
david.singh@verizon.net
Choosing a Network Access Mode and Finding a Wireless Network
You can choose between three network access modes when locating available Wi-Fi networks within range of your computer. Each network access mode offers a different level of security.
After you've connected to a network, the Wireless Network Connection window enables you to manage your network connections. Using this window you can connect or disconnect from networks, or change the order of preferred networks when more than one is available.
Choosing a network access mode
Follow these steps to choose a network access mode:
1. Double-click the wireless connection icon in the Windows system tray (in the lower-right corner of the screen).
| If you don't see a wireless connection icon in the system tray, choose Start --> All Programs --> Accessories --> Communications --> Network Connections. Right-click your wireless connection and choose Properties. Select the Show Icon in Notification Area When Connected check box and click OK. |
2. In the Wireless Network Connection Status dialog box, click the Properties button.
3. In the Wireless Network Connection Properties dialog box, click the Wireless Networks tab.
4. Click the Advanced button to open the Advanced dialog box.
5. Choose a network access mode:
• Any Available Network (Access Point Preferred): The computer tries to connect to any wireless network that is detected.
• Access Point (Infrastructure) Networks Only: The computer tries to connect to networks using a wireless access point. This setting gives you more security, especially at Wi-Fi hotspots.
• Computer-to-Computer (Ad Hoc) Networks Only: The computer tries to connect to other computers, called ad hoc networking.
6. If you want to automatically log on to any available wireless network, select the Automatically Connect to Non-Preferred Networks check box.
| Automatically logging on to any available network could leave your computer vulnerable to unknown and untrusted networks. Do not enable this option if your computer contains sensitive or personal information. |
7. Click Close to close the Advanced dialog box and click OK to close all remaining dialog boxes.
Searching for wireless networks
Use these steps to search for a wireless network within range of your computer:
1. Double-click the wireless connection icon in the Windows system tray.
2. In the Wireless Network Connection Status dialog box, click the View Wireless Networks button.
3. In the resulting Wireless Network Connection window, click Refresh Network List in the Network Tasks menu on the left side of the screen.
Have any queries feel free to maill me
david.singh@verizon.net
Configuring wireless printer to wireless networking
When everything is properly configured, any computer on your network should be able to use a shared network printer. You can share a printer wirelessly using a wireless print server, a device designed specifically to connect printers to Wi-Fi networks. When you connect your printer to a wireless print server, any computer on your network can access the printer directly through the network.
Selecting a wireless print server
Follow these steps to select a wireless print server for your home network:
1. Make sure the print server is a wireless print server.
2. Determine to which type of port your printer connects. Most modern printers connect directly to a USB port, so a print server with a USB port is a safe bet in most cases.
3. Purchase a print server with enough ports to accommodate all of your printers.
4. Check the security features supported by the print server.
| Many print servers support only WEP encryption and not WPA. If you use WPA encryption on your network, a WEP-only print server will not be compatible. |
Setting up the hardware
To set up the hardware for your print server, follow these steps:
1. For the initial configuration, connect the print server to your router/WAP using an Ethernet cable (see Figure 1).
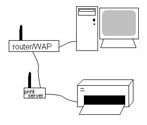
Figure 1: Connect an Ethernet cable between the print server and router.
2. Make sure that the printer's power is turned off and then connect the printer to the print server.
3. Turn on the printer and then connect the power cord for the print server.
4. Configure the print server's Wi-Fi connection.
5. After you have configured the print server's Wi-Fi connection, disconnect the Ethernet cable so that the print server connects to your network wirelessly.
| If the print server is unable to connect to the wireless network after you disconnect the Ethernet cable, disconnect the print server's power cable for several seconds and then reconnect it. If the problem persists, try rebooting the router/WAP as well. |
Configuring the print server
Use these steps to configure the print server:
1. Install the print server utility program on one of your network computers.
2. On the computer on which you installed the utility program, choose Start --> Run.
3. In the Run dialog box, type CMD and click OK.
4. At the command prompt, type ipconfig, as shown in Figure 2, and press Enter.
5. Make a note of the IP address, subnet mask, and default gateway that appear (see Figure 2).
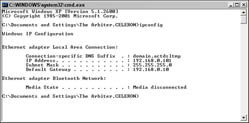
Figure 2: Write down the IP address, subnet mask, and default gateway.
| The subnet mask and default gateway are the same for each computer on your network. Each computer also shares the first three segments of the IP address, but the last segment of the IP address is unique to each computer and wireless device. |
6. Type EXIT and press Enter to close the command prompt window.
7. Run the configuration utility for the print server. After the print server utility software is installed, you should be able to run it from the Start menu.
8. Click Change IP address.
9. Select the DHCP Automatically Assign option and click OK.
| In most cases, having an IP address automatically assigned to the print server is preferable. However, if the print server doesn't work with automatic IP assignment, follow the next few steps to set the network addresses manually. |
10. Enter the first three segments of your network's IP address. For the last segment of the IP address, enter a number between zero and 254.
11. Enter your network's subnet mask and default gateway and click OK to save your changes.
12. Open the print server's Web browser configuration utility. Locate the Wireless settings and enter your SSID, WEP keys, and other Wi-Fi security settings.
Installing printer drivers on network computers
Follow these steps to install printer drivers on your network computers:
1. Insert the setup disc that came with your printer in the computer from which you want to print.
2. Use the installation utility to install the printer drivers.
3. Repeat the installation on each network computer from which you plan to print documents.
| In some cases it may not be necessary to install printer drivers. Printer drivers for many modern printers are built-in to Windows XP and Mac OS X. |
Got any queries feel free to contact me
david.singh@verizon.net
Adding a Wireless Printer to your wireless network
When everything is properly configured, any computer on your network should be able to use a shared network printer. You can share a printer wirelessly using a wireless print server, a device designed specifically to connect printers to Wi-Fi networks. When you connect your printer to a wireless print server, any computer on your network can access the printer directly through the network.
Selecting a wireless print server
Follow these steps to select a wireless print server for your home network:
1. Make sure the print server is a wireless print server.
2. Determine to which type of port your printer connects. Most modern printers connect directly to a USB port, so a print server with a USB port is a safe bet in most cases.
3. Purchase a print server with enough ports to accommodate all of your printers.
4. Check the security features supported by the print server.
| Many print servers support only WEP encryption and not WPA. If you use WPA encryption on your network, a WEP-only print server will not be compatible. |
Setting up the hardware
To set up the hardware for your print server, follow these steps:
1. For the initial configuration, connect the print server to your router/WAP using an Ethernet cable (see Figure 1).
Figure 1: Connect an Ethernet cable between the print server and router.
2. Make sure that the printer's power is turned off and then connect the printer to the print server.
3. Turn on the printer and then connect the power cord for the print server.
4. Configure the print server's Wi-Fi connection.
5. After you have configured the print server's Wi-Fi connection, disconnect the Ethernet cable so that the print server connects to your network wirelessly.
| If the print server is unable to connect to the wireless network after you disconnect the Ethernet cable, disconnect the print server's power cable for several seconds and then reconnect it. If the problem persists, try rebooting the router/WAP as well. |
Configuring the print server
Use these steps to configure the print server:
1. Install the print server utility program on one of your network computers.
2. On the computer on which you installed the utility program, choose Start --> Run.
3. In the Run dialog box, type CMD and click OK.
4. At the command prompt, type ipconfig, as shown in Figure 2, and press Enter.
5. Make a note of the IP address, subnet mask, and default gateway that appear (see Figure 2).
Figure 2: Write down the IP address, subnet mask, and default gateway.
| The subnet mask and default gateway are the same for each computer on your network. Each computer also shares the first three segments of the IP address, but the last segment of the IP address is unique to each computer and wireless device. |
6. Type EXIT and press Enter to close the command prompt window.
7. Run the configuration utility for the print server. After the print server utility software is installed, you should be able to run it from the Start menu.
8. Click Change IP address.
9. Select the DHCP Automatically Assign option and click OK.
| In most cases, having an IP address automatically assigned to the print server is preferable. However, if the print server doesn't work with automatic IP assignment, follow the next few steps to set the network addresses manually. |
10. Enter the first three segments of your network's IP address. For the last segment of the IP address, enter a number between zero and 254.
11. Enter your network's subnet mask and default gateway and click OK to save your changes.
12. Open the print server's Web browser configuration utility. Locate the Wireless settings and enter your SSID, WEP keys, and other Wi-Fi security settings.
Installing printer drivers on network computers
Follow these steps to install printer drivers on your network computers:
1. Insert the setup disc that came with your printer in the computer from which you want to print.
2. Use the installation utility to install the printer drivers.
3. Repeat the installation on each network computer from which you plan to print documents.
| In some cases it may not be necessary to install printer drivers. Printer drivers for many modern printers are built-in to Windows XP and Mac OS X. |
Configuring TCP/IP
Installing and configuring TCP/IP creates most of the files you need automatically. Just point your mouse, click, and type some text. Your setup program creates and maintains the files for you.
The one exception is when you're working on an older UNIX computer or a very small Linux system that has no network setup program. In this sad case, the network administrator (who is probably you if you're reading this article) must create some files and edit others. How you do this is up to you. A text editor works just fine.
The hosts file
You start with the most fundamental file that you need for communicating with other computers on your network — the hosts file.
When you access another host by name on the Internet or any intranet/internet, your computer needs to know the remote host's IP address. You can get remote host addresses from DNS (Domain Name System) or from your computer's hosts file. This file lists the names and addresses of other hosts known by your computer.
When you need to know about thousands of hosts on the Internet, maintaining the hosts file is really too cumbersome a mechanism. Imagine having to spend all that time updating it as computers come and go or relocate on the Internet! In that case, you need DNS to locate remote hosts.
The location and name of the hosts file depend on the operating system and version of TCP/IP you use. Table 1 lists the hosts file locations for a few implementations of TCP/IP.
Table 1: Popular Locations for Hosts Files
Location | Operating System | Vendor |
/etc/hosts | Linux and UNIX | Various |
c:\winnt\system32\drivers\etc\hosts | Windows NT, 2000 | Microsoft |
c:\windows\hosts | Windows 95, 98 | Microsoft |
c:\windows\system32\drivers\etc\hosts | Windows XP | Microsoft |
Netinfo database | Apple | Mac OS X |
/etc/hosts | zOS | IBM |
| Maintaining the hosts file |
Your operating system or TCP/IP product provides a hosts file to get you started. You, the network administrator, the system manager, or whoever is in charge of network configuration, maintains the hosts file. As you add host names and addresses, you need to update the file. If your vendor did not include a network configuration tool, you get to use a plain old text editor, such as Notepad, to type in two columns of information — column 1 for the host's IP addresses and column 2 for its names.
Finding what's in the hosts file
Figure 1 shows the contents of a hosts files taken from a computer running UNIX. Looking at Figure 1, you may think there are several host names on a line. But the first name is the host name and the following name(s) are nifty host name aliases. Look carefully at the entry for the host spiderman. Do you see an alias, peterparker? You can refer to the computer as either spiderman or peterparker. Anything preceded by a # character is a free-form comment about things such as the computer's owner, location, operating system, and whatever else you think is meaningful.
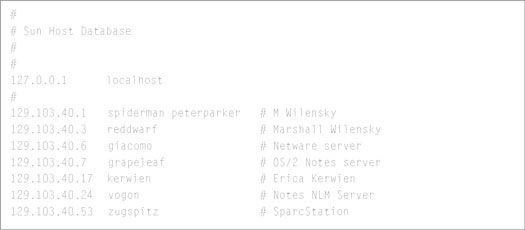
Figure 1: This hosts file, created with a text editor, contains the IP addresses and the host names.
Improving TCP/IP's digestion of the hosts file
| Without an up-to-date hosts file, you may not be able to find other computers on the network, so it's important to update the file whenever a computer changes its name or address or joins or leaves the network. Listing the computers in most frequently used order is a good idea. TCP/IP searches the hosts file sequentially from top to bottom until it finds the computer it's looking for, so if you have a large hosts file, ordering the computers appropriately gives you a performance advantage. |
The trusted hosts file
On Linux and UNIX operating systems, the file /etc/hosts.equiv lists the other hosts on the network that your computer trusts; this is your trusted hosts file. This file is easy to create with any text editor. It has only one column — the host name of each computer you trust. (See Figure 2.)

Figure 2: The hosts.equiv file lists trusted hosts.
| Be very careful with the hosts.equiv file. Any remote computer listed here is a trusted host, and all of its users can log on to your computer without knowing a password. |
Some operating systems implement trust by using other methods besides a trusted hosts file. Microsoft Windows NT and 2000 Server, for example, don't use the hosts.equiv file. Instead, you set up trust relationships when you set up security policies for your computer or Active Directory for your domain. Trust relationships are between domains as opposed to individual hosts. See Figure 3.
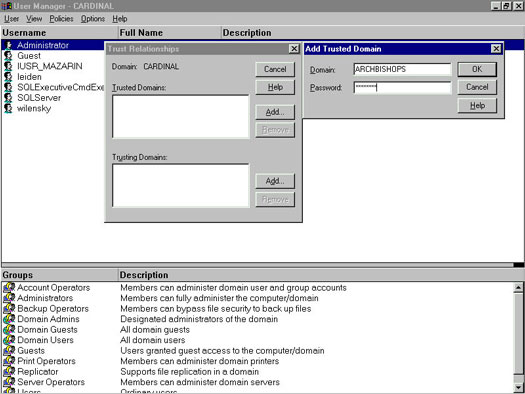
Figure 3: The entire cardinal domain (Windows NT Server 4.0) trusts the entire Archbishops domain.
The trusted hosts print file
On Linux and UNIX, you can use the /etc/hosts.lpd file to list the remote hosts that can print on the printer attached to your computer. The simplest hosts.lpd file possible contains just one asterisk (*) character, which means that any host on the network can share your printer. If you don't have a hosts.lpd file, it's the same as having the file with an asterisk in it. So if you aren't prepared to be super generous with your printer, you'd better create one of these hosts.lpd files. Any text editor will do.
| Speaking of generosity, how generous can you afford to be with your printer? If you share your printer with all of the hosts on your network, will the volume of remote print jobs mean that you always have to wait before you can print your own stuff? Will this same print job traffic clog up the network connection media (the cables)? You should ask yourself these questions before editing your hosts.lpd file. |
Subscribe to:
Posts (Atom)