Google Search


Friday, August 24, 2007

Getting Pictures into Your Mac

Taking pictures with most digital cameras is a snap. Taking good digital pictures is another matter entirely.
When you press your digital camera's shutter button, images are typically captured onto small (and removable) memory cards. Even as the price of memory declines, the capacity on these cards rises. You can now capture many hundreds of pictures on relatively inexpensive cards.
In the past, it was a challenge to get digital images onto your computer, where the real fun begins. iPhoto drastically simplifies the process.

Connecting a digital camera

In most cases, you run a direct connection from the digital camera to the Mac by connecting the USB cable supplied with the camera. Turn the camera off and then plug one end of the cable into the camera and the other end into the Mac. Turn the camera back on.
iPhoto opens, assuming that you clicked Yes when the program asked you whether you want to use iPhoto to download photos when a camera is connected. (This question pops up the first time you launch the program.) The way iPhoto takes charge, you won't even have to install the software that came with your camera. Given how cumbersome some of these programs can be, that is a blessing.
If everything went down as it should and iPhoto was called into action, skip ahead to the next section. If you ran into a problem, you can try the following solutions:
  • Make sure that your camera is turned on and you have a fresh set of batteries.
  • Because every camera is different, consult the instructions that came with your model to make sure that it's in the proper setting for importing pictures (usually Play mode).

Importing images from the camera

When you connect a camera and iPhoto comes to life, the main screen indicates that it's ready to import images.
To transfer images, follow these steps:
1. Type a Roll Name and Description for your photos in the appropriate fields.
2. Determine whether you want to erase the pictures from the camera after they have been copied into iPhoto.
To do so, select the Delete Items from Camera after Importing option. If you're not sure, you can always delete images directly from the camera later.
3. Click Import.
Your pictures are on their way to their new home inside iPhoto's digital shoebox. The process may take several minutes, depending on how many pictures you're moving over. The time depends on a variety of factors, including the number and quality of the images being imported. You'll see the images whiz by as they're being copied.
4. When the program has finished importing, click the Eject button or drag the camera's name from the source list to iPhoto trash, at the bottom of the source list.
5. Turn off and disconnect the camera.
Seeing double? If iPhoto detects a duplicate photo, it asks whether you're sure you want to copy it over again. Click Import to proceed or Don't Import to skip this particular image. To avoid getting this question for each duplicate image, select the Apply to All Duplicates option.
iPhoto will also copy over movie clips from your digital camera, provided that they're compatible with QuickTime. These videos are automatically transferred in the same way as still images.

Importing images from other sources

Not all the pictures in your iPhoto library arrive by direct transfer from your digital camera. Some reach the Mac by the Web, email, CDs or DVDs, flash drives, or memory card readers. Other pictures may already reside someplace else on your hard drive.
To get these pictures into iPhoto, simply drag them into the iPhoto viewing area or onto the iPhoto dock icon. You can drag individual pictures or an entire folder or disk.
If you prefer, choose File --> Import to Library and browse for the files you want to bring over. Then click Import.
iPhoto is compatible with JPEG and TIFF, the most common image file formats, as well as a photo-enthusiast format (available on some digital cameras) known as RAW.
If you haven't bought a digital camera yet and are shooting 35mm film, you can still play in iPhoto's sandbox. Have your neighborhood film processor transfer images onto a CD or post them on the Web. Given where the film processing industry is heading, it'll be thrilled to have your business.

Figuring Out What iDVD Is All About

DVD is the medium of choice for movies, having replaced videotape in the last few years. DVD stands for Digital Versatile Disc (not digital video disc, which is an older medium that has since bought the farm). The name reinforces the concept that DVD holds anything from video to music to photos and is a versatile medium to use — it is, in fact, the first consumer medium that allows the viewer to interact with the content by using menus to navigate the disc's movies, excerpts, photos, and multiple soundtracks.

DVD authoring is the process of assembling the contents of a DVD and designing the interface — the menus and buttons that allow you to navigate the contents. Authoring used to require expensive digital video and DVD mastering hardware and software and authoring expertise. But with iDVD and a SuperDrive-equipped Mac, you can easily create DVDs to distribute your own videos and presentations.

iDVD is an application that offers tools for creating DVDs that contain menus and buttons to navigate the contents of the discs. iDVD requires a Mac with an Apple SuperDrive, which is a DVD-R (recordable DVD) burner. Besides offering professionally designed menu themes with spectacular special effects, iDVD allows you to grab your photos from iPhoto, import your QuickTime movies from iMovie, and use your music from iTunes.

With iDVD, you can put movies on DVD, of course. But you can add the following features to the DVD besides a menu with a button to play a movie:

  • Mark sections of a movie you create with iMovie as chapters so that viewers can jump to specific sections. Those chapter titles can be automatically turned into a scene menu to access the specific sections of the movie.
  • Add nifty movie menus animated with scenes from the movie. You can define up to 30 menus in one iDVD project, and you can define up to six buttons in a menu that link to submenus, slideshows, or movies.
  • Create a slideshow of your photographs that is accompanied by music. Each slideshow can contain up to 99 images, and a DVD can contain up to 99 slideshows or movies in any combination.

You can fit up to 90 minutes of video on a DVD-R using iDVD, including all still images, backgrounds, and movies. However, if you put more than 60 minutes of video on a DVD-R, the picture quality may suffer because iDVD uses stronger compression with a slower bit rate to fit more than 60 minutes of video on the disc, and both factors reduce overall picture quality. The best approach is to limit each DVD-R to 60 minutes.

DVD is a mass-produced medium, like audio CDs. The discs are read-only — they can't be modified in any way, only viewed. To create even a mass-produced DVD, you have to burn a recordable DVD (DVD-R) with the content. The DVD-R serves as a master to mass-produce the type of DVDs you see in stores. With iDVD, you can burn a DVD-R that you can then use in normal DVD players, and you can also use the DVD-R as a master to provide a service that mass-produces DVDs.

Follow these steps to make a DVD:

1. Import all the content into iDVD.

iDVD enables you to import movies from iMovie projects, QuickTime movies, iPhoto slideshows, and iTunes songs and playlists.

2. Choose a theme for your DVD menus, buttons, and background.

iDVD is supplied with professionally designed themes that you can use to create your own menus and submenus. Themes provide a design that integrates menu elements in a consistent way and makes navigation easier. iDVD allows you to customize these themes into unique menus for your DVDs.

3. Customize the theme with your specific menus, buttons, backgrounds, and content.

After choosing a theme, you assign media elements, such as movies and sounds, to menus, buttons, and backgrounds, to make your DVD project look as professional as a commercial DVD. iDVD gives you a great deal of control over theme elements.

4. Preview and then burn your DVD-R.

iDVD makes previewing the interactive experience of your DVD-R easy, so you don't waste a blank disc on a flawed presentation. You can make changes and adjustments, and preview it again. When you're ready, you can then burn a DVD-R quickly and easily with your SuperDrive-equipped Mac.

You get one chance with a DVD-R — after you burn video to it, you can't rewrite it. Gather everything you want to put on the disc beforehand, so you don't waste a disc.

Listening to Web Radio with iTunes

Now you can reach radio stations on the Internet that represent nearly every area of the world. You can tune into Japan-A-Radio for the top 40 hits in Japan, Cable Radio UK from the south coast of England, or Radio Darvish for Persian traditional music. You can also check out the local news and sports from your hometown, no matter where you are. You can listen to talk radio and music shows from all over the country and the world.

You can't record or save a song from a radio broadcast without special software. But you can add your favorite stations to your music library or to a playlist to tune in quickly and easily. You can also tune in any Web radio or streaming broadcast if you know the Web address.

Streaming music from the Internet

Apple provides links within iTunes directly to radio stations on the Internet, so you may want to try these first. Follow these steps:

1. Click the Radio option in the Source list.

The iTunes window displays a list of categories of radio stations.

2. Click the Refresh button to retrieve the latest radio stations.

More Web radio stations are added all the time. The Refresh button in the upper-right corner of the iTunes window (taking the place of the Browse button) connects iTunes to the Internet to retrieve the latest list of radio stations for each category.

3. Click the triangle next to a category name to open the list of radio streams in that category.

Radio station broadcasts stream to your computer over the Internet — sections of the audio transfer and play while more sections transfer so that you hear it as a continual stream. Some large radio stations offer more than one stream.

4. Select a stream and click the Play button.

Within seconds, you hear live radio off the Web.

If you use a dialup modem connection to the Internet, you may want to choose a stream with a bit rate of less than 56 Kbps for best results. The Bit Rate column shows the bit rate for each stream.

Saving your favorite stations

Car radios offer preset stations that are activated when you press a button. Of course, you first need to tune in to the station of your choice to set that button. You can do the same with iTunes, and the process is just as easy. Follow these steps:

1. Select a radio station stream.

2. Create a playlist or scroll the Source list to an existing playlist.

3. Drag the stream name over the playlist name.

iTunes places the stream name in the playlist with a broadcast icon next to it. You can click the playlist name and rearrange the playlist as you want, dragging stream names as you would drag song names.

Drag as many streams as you like to as many playlists as you like. Radio streams in your playlists play only if you are connected to the Internet.

To quickly create a playlist from selected radio streams, first select the streams (by holding down Shift or the Command key to make multiple selections) and then choose File --> New Playlist from Selection.

Adding Web broadcasts

Millions of Web sites offer temporary streaming audio broadcasts. A rock group on tour may offer a broadcast of a special concert, available for only one day. You may want to tune in weekly or monthly broadcasts, such as high-tech talk shows, news programs, documentaries, or sporting events — the list is endless. You may even have access to private broadcasts such as corporate board meetings.

All you need to know is the Web address, also known as the URL (Uniform Resource Locator) — the global address of documents and other resources on the Web. You can find most URLs from a Web site or email about a broadcast. Follow these steps to add a Web broadcast to a playlist:

1. Choose Advanced --> Open Stream.

The Open Stream dialog box appears, with a URL text field for typing a Web address.

2. Type the exact, full URL of the stream.

Include the http:// prefix, as in http://64.236.34.141:80/stream/1014.

If you're connected to the Internet, iTunes automatically retrieves the broadcast and places it at the end of your song list.

3. Click OK.

Covering Common Mac Problems

Your computer won't have to visit the emergency room or undergo major surgery, but a little first aid is probably in order here and there. The solutions to several Mac problems are offered in the following sections.

Fixing a jumpy mouse

The optical-style mice included with the most recent Macs don't get stuck like their ancestors because this kind of critter doesn't use the little dust-collecting rolling ball on its underbelly. However, optical mice don't particularly like glass or reflective surfaces, so if you find your mouse on one, use a mouse pad or slip a piece of paper underneath it.

If your mouse just doesn't respond, unplug it from the USB port and then plug it in again, just to make sure that the connection is snug. If you have a wireless mouse, make sure that the batteries are fresh.

Dealing with a stuck CD

When your Mac won't spit out a disc, take a stab at one of these fixes:

  • Quit the program that's using the disc, and then press Eject on the keyboard.
  • Open a Finder window, and click the little Eject icon in the sidebar. Or, try dragging the disc icon from the Mac desktop to the trash.
  • Log out of your user account (under the Mac menu), and then press Eject on the keyboard.
  • Restart the computer while holding down the mouse button.

Fixing your Mac's clock

If your computer can no longer keep track of the time and date, its internal backup battery may have bit the dust. You can't replace the battery yourself, so you'll have to contact the Apple store or visit an authorized service provider.

Making programs open nonnative files

The Mac makes certain assumptions about which application ought to open a particular file when summoned. But say that you want the Adobe programs Photoshop and Reader to be responsible for JPEGs and PDFs, and Mac's own word processor, TextEdit, to take care of Word DOC duties.

Here's what to do:

1. Highlight the icon of the program that you want to be opened by a different application and press Command+I.

2. In the Get Info panel that appears, click the right-facing triangle next to Open With and choose the application to handle the document from here on out.

Alternatively, access the Open With command by highlighting the file icon in question and choosing File --> Open With. You can also bring up the Get Info pane from the same menu. Still another way to get to Open With: Press Control while clicking the icon (or right-click if your mouse has two buttons).

3. If you want the application to open each and every file you beckon in the future, click Change All.

Handling kernel clink

Out of the blue, you are asked to restart your computer — in numerous languages, no less. Your machine has been hit with a kernel panic. The probable cause is corrupted or incompatible software.

The good news is that a system restart usually takes care of the problem with no further harm. If not, try removing memory or hardware you've recently added. Or, if you think some new software you installed may have been the culprit, head to the software publisher's Web site and see whether a downloadable fix or upgrade is available.

Fixing DNS problems

If you're surfing the Web with Safari or another browser and get a message about a DNS entry not being found, you typed the wrong Web address or URL, the site in question no longer exists (or never did), or the site is having temporary problems. DNS is computer jargon for Domain Name System. Similar messages may be presented as a 404 not found on this server error.

Curing the trash can blues

In the physical world, you may try and throw something out of your trash but can't because the rubbish gets stuck to the bottom of the can. The virtual trash can on your Mac sometimes suffers a similar fate: A file refuses to budge when you click Empty Trash under the Finder menu.

Try junking the files by holding down the Option key when you choose Empty Trash.

A file can refuse to go quietly for several reasons. For starters, you can't delete an item that is open somewhere else on your computer, so make sure that it's indeed closed. Moreover, you may be trying to ditch a file to which you do not have sufficient permission. The other most likely explanation is that a lockedfile is in the trash. You can unlock it by choosing File --> Get Info and making sure to deselect the Locked check box.

Working with Aliases in Mac OS X

An alias is a tiny file that automatically opens the file that it represents. Although an alias is technically an icon, it's actually an icon that opens another icon automatically. You can put aliases in convenient places, such as on the Desktop, to help you easily open programs and files that you access often.

In effect, Microsoft stole the alias feature from Apple (if you've used Windows, you may know aliases as shortcuts). However, aliases usually don't break when you move or rename the original file; shortcuts do.

An alias is different from a duplicated file. For example, the Microsoft Word 2004 application uses 19.4 megabytes (MB) of disk space. A duplicate of Microsoft Word 2004 would give you two files, each requiring nearly 20 megabytes of space on your hard drive. An alias of Microsoft Word 2004, on the other hand, uses a mere 52 kilobytes (KB).

Aliases can open any file or folder on any disk from anywhere else on any disk — which is a very good trick. But aliases are great for many other reasons:

  • Convenience: Aliases enable you to make items appear to be in more than one place, which on many occasions is exactly what you want to do. For example, keeping an alias of your word processor on your Desktop and another on the Dock is convenient. You may even want a third alias of it in your Documents folder for quick access. Aliases enable you to open your word processor quickly and easily without navigating into the depths of your Applications folder each time that you need it.
  • Flexibility and organization: You can create aliases and store them anywhere on your hard disk to represent the same document in several different folders. This is a great help when you need to file a document that can logically be stored in any one of several files. For example: If you write a memo to Fred Smith about the Smythe Marketing Campaign to be executed in the fourth quarter, which folder does the document go in? Smith? Smythe? Marketing? Memos? 4th Quarter? Correct answer: With aliases, it can go in all of them if you like. Then you can find the memo wherever you look, instead of guessing which folder you filed it in.
    With aliases, it doesn't matter. You can put the actual file in any folder and then create aliases of the file, placing them in any other applicable folder.
  • Integrity: Some programs must remain in the same folder as their supporting files and folders. Many Classic programs, for example, don't function properly unless they're in the same folder as their dictionaries, thesauruses, data files (for games), templates, and so on. Thus, you can't put the icon for those programs on the Desktop without impairing their functionality. An alias lets you access a program like that from anywhere on your hard disk.

Creating aliases

When you create an alias, its icon looks the same as the icon that it represents, but the suffix alias is tacked onto its name and a tiny arrow called a badge appears in the lower-left corner of its icon. Figure 1 shows both an alias and its parent icon (that is, the icon that opens if you open the alias).


Figure 1: An alias icon (right) and its parent.

To create an alias for an icon, do one of the following:

  • Click the parent icon and choose File --> Make Alias.
  • Click the parent icon and press Command+L.
  • Click any file or folder, press and hold down the Command and Option keys, and then drag the file or folder while continuing to hold down the Command and Option keys.
    Presto! An alias appears where you release the mouse button. Better still, aliases created this way don't have that pesky alias suffix tacked onto them.
  • Click an icon while holding down the Control key and then choose the Make Alias command from the contextual menu that appears.
    The alias appears in the same folder as its parent.

Deleting aliases

Deleting an alias is an easy chore. To delete an alias, simply drag it onto the Trash icon on the Dock. That's it! You can also Control-click it and choose Move to Trash from the contextual menu that appears, or select the icon and use the keyboard shortcut Command+Delete.

Deleting an alias does not delete the parent item. (If you want to delete the parent item, you have to go hunt it down and kill it yourself.)

Hunting down an alias' parent

Suppose that you create an alias of a file, and later you want to delete both the alias and its parent file — but you can't find the parent file? What do you do? Well, you can use the Finder's Find function (try saying that three times real fast) to find it, but here are three faster ways to find the parent icon of an alias:

  • Select the alias icon and choose File --> Show Original.
  • Select the alias icon and use the keyboard shortcut Command+R.
  • Control-click the alias icon and choose Show Original from the contextual menu.

Looking into Routed versus Routing Protocols

When you review routers and their protocols, a good place to start is the difference between a routed protocol and a routing protocol. Knowing the difference between these two protocols is fundamental to understanding how routers route.

Networked devices communicate over routes, which are paths between sending devices and receiving devices. A networked device learns about a route between it and another device in a variety of ways:

  • Manually: A network administrator can manually configure a route.
  • Pull: Devices can send out polling messages or "probes" to discover the route to a destination.
  • Push: Devices can send out route information about routes it knows.

Regardless whether the route information is manually entered, discovered, or received from another device, the information learned is stored in the routing table for later use.

Inside versus outside

A routing protocol sends and receives routing information packets to and from other routers. A routed protocol can be routed by a router, which means that it can be forwarded from one router to another. Yes, there are protocols that can't be routed, such as NetBEUI (Network Basic Input Output System Extended User Interface).

That a routed protocol can be routed may seem obvious, but unless you know how to differentiate it from a routing protocol, you may have trouble with the wording for some questions on the exam.

A protocol is a set of rules that defines how two devices communicate with one another. It also defines the format for the packets used to transmit data over communications lines. A routed protocol contains the data elements required for a packet to be sent outside its host network or network segment. In other words, a routed protocol can be routed. Protocols used to communicate routing information between routers within an autonomous system are Interior Gateway Protocols (IGP), which are routing protocols, but not routed protocols.

Routing protocols gather and share the routing information used to maintain and update routing tables. That routing information is in turn used to route a routed protocol to its final destination. Routing Information Protocol (RIP) and Interior Gateway Routing Protocol (IGRP) are the routing protocols you need to know for the exam. If you can remember what the abbreviations mean, you'll remember that they are routing protocols because they have routing in their names. Remember, too, that they are not routed protocols.

In short, routed protocols route your data and routing protocols send routing updates between routers about the status of the network so that your routed protocol data can be routed. Got that? No? Well, try this to help keep it straight:

1. Routed protocols get routed.

2. Routing protocols are for updating (the info about the routes over which routed protocols are routed).

Examples of routed protocols are IP and IPX, and examples of routing protocols are RIP and IGRP.

A routing we will go

Routing is the process of moving data along a path from a source to a destination. The complexity of this process involves finding the most efficient route from a multitude of available routes. Routing occurs at the Network layer (Layer 3).

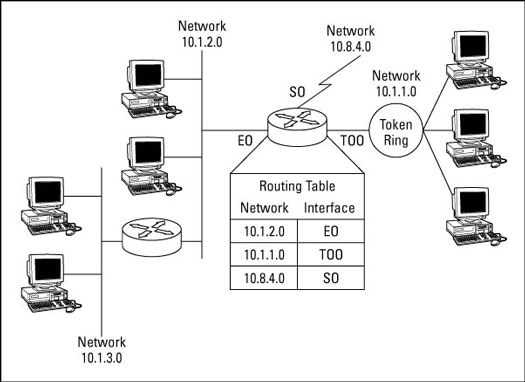
To assist itself in making its routing decisions, the router builds routing tables to store information about routes to networks it has previously discovered. Most routers keep an entry, known as the default route, in their table to be used when the router doesn't have an explicit route for a packet. Figure 1 shows both what a routing table contains as well as where it fits into a network. Notice that it consists of network addresses and the interface to which each device, associated with an address, is connected.


Figure 1: A routing table of a network router.

Routing types you need to know for the exam

As far as the CCNA exam goes, there are three types of routing: static, dynamic, and default. Details about these routing types appear in the following sections.

Static routes: One-lane roads

Static routes are fixed routes that are manually entered by the administrator into the router's configuration. If a static route is entered into the configuration, it must be manually updated should the network topology change. Not that the topology of the network is likely to change too frequently, but you may decide to change the segmenting structure or make other topology-level changes. When changes occur, the administrator must update the router configuration to include the changes, which is why static routing is not generally used in a large network. The time required to maintain the routing tables can become a burden.

Static routes are generally used if the internetwork, the part of the network that lies beyond the router, is accessible through only one path. A network with only a single path to the rest of the internetwork is known as a stub network. Static routes are also used for security reasons because they allow the administrator to restrict knowledge of the network from outside sources. A static route is configured on the router with a command like this:

Router(config)#ip route 192.168.1.0 255.255.255.0 192.168.101.1 3

This example contains the command (ip route) and the IP address of the destination network, the subnet mask, the IP address of the next hop router, and an administrative distance (more on that later).

Using the previous command example, the key elements of the static route configuration command are (memorize these for the exam):

  • ip route: This is the command used to designate a static route.
  • destination address: In this example, 192.168.1.0 is the IP address of the destination network.
  • subnet mask: 192.168.1.0 is a Class C IP address and is using the default subnet mask for Class C addresses, 255.255.255.0.
  • next hop: Following the subnet mask is the address of the next hop router, 192.168.1.1.
  • administrative distance: This is a number between 0 and 255 that indicates how well the route can be trusted. The higher the number, the lower the trust. An administrative distance of 120 falls about midrange on the trustworthiness scale. So, as indicated by the 3 in the ip route command, this route is very trustworthy.

A dynamic personality

Dynamic routing is the process by which a network adapts automatically to the changes in topology or traffic as those changes occur. To be successful, dynamic routing requires timely maintenance of routing tables. The routing protocol used defines how this occurs and includes such information as when, what, and how the updates are sent.

When all else fails

A default route is very much like a static route. The administrator enters the default route, and it becomes the default path the router uses to forward packets for which it knows no other route to use. Without a default route, packets with unknown destinations are dropped.

When no specific next hop is listed in the routing table for a particular type of packet, the router uses its default route, a preassigned route that is generally available.

Unmasking the Subnet Mask

With the rapid growth of the Internet and the ever-increasing demand for new addresses, the number of available networks and hosts in the standard address class structure can be expanded by borrowing bits from the host portion and using them to allow for more networks. Under this addressing scheme, called subnetting, separating the network and host requires a special mechanism called a subnet mask. A subnet mask, which contains a binary bit pattern of ones and zeros, is applied to an address to extract the network ID for purposes of determining whether an address is on the local network. If not, the address is switched or routed on.

The function of a subnet mask is to extract the network ID portion of an IP destination address and determine whether an IP address exists on the local network or whether it must be routed outside the local network. If the extracted network ID matches the local network ID, the destination is located on the local network. However, if they don't match, the message must be routed outside the local network. The process used to apply the subnet mask involves Boolean algebra to filter out nonmatching bits.

Boolean nightmares

Don't worry; you don't need to relive your past-life algebraic nightmares to pass the CCNA exam. Boolean algebra is a process that applies binary logic to yield binary results. What a relief, huh?

Working with subnet masks, you need only four basic principles of Boolean algebra:

  • 1 and 1 = 1
  • 1 and 0 = 0
  • 0 and 1 = 0
  • 0 and 0 = 0

Or in other words, the only way you can get a result of a 1 is to combine 1 and 1. Everything else ends up as 0.

The process of combining binary values with Boolean algebra is called anding.

Subnet masks

There are default standard subnet masks for Class A, B, and C addresses. Table 1 lists the commonly used subnet masks for each IP address class.

Table 1: Standard IP Class Default Subnet Masks

Address Class

Subnet Mask

Class A

255.0.0.0

Class B

255.255.0.0

Class C

255.255.255.0

The subnet mask is like a strainer or filter that is applied to a message's destination IP address. Its objective is to determine whether the local network is the destination network. It goes like this:

1. If a destination IP address is 206.175.162.21, you know that it's a Class C address and its binary equivalent is 11001110 10101111 10100010 00010101.

2. The default standard Class C subnet mask is 255.255.255.0 and its binary equivalent is 11111111 11111111 11111111 00000000.

3. When these two binary numbers (the IP address and the subnet mask) are combined using Boolean algebra (anding), the network ID of the destination network is the result:

206.175.162.21 11001110 10101111 10100010 00010101

and

255.255.255.0 11111111 11111111 11111111 00000000

yields

11001110 10101111 10100010 00000000

4. The result is the network ID of 206.175.162.0.

Subnet masks apply only to Class A, B, or C IP addresses.

Segmenting a Network with a Router

Segmenting a LAN with a router may not be the least expensive way to go, but it does have its benefits. You can expect to find questions on the benefits of segmenting a network with a router on the CCNA exam.


There are definitely less expensive ways to segment a network, such as with a bridge, and there are certainly faster, simpler ways, such as with a switch, but a router can provide benefits these devices cannot.


Why segment a network?


Here are some of the general benefits of segmenting a LAN, regardless of how that was accomplished:


  • Keeps local traffic local: Breaking up a network into smaller segments reduces congestion on the network by reducing the overall traffic loads.

  • Increases the bandwidth available to each user: Bandwidth is a shared entity, but each segment and its users have full use of the bandwidth available. For example, if there are 100 users on a 100 Mbps segment, each user has an average of 1 Mbps of available bandwidth. If this same segment were further segmented into 10 segments with 10 users on each segment, however, then every user would have an average of 10 Mbps of available bandwidth.


  • Fewer collisions: In general, traffic tends to stay within a segment, and less traffic is routed beyond the segment to contend for access to the backbone.

  • Reduces Ethernet distance limitations: An Ethernet network has inherent distance limitations. When a network is segmented with a router (and only a router; not a bridge, and not a switch), the beginning point from which the maximum distance for the cabling is determined is re-established.

Segmenting a LAN with a router


The CCNA exam focuses on why you would segment a LAN. There are several ways to segment a LAN — with a bridge, a switch, or a router. Just in case you're curious, how you segment a LAN with a router involves some knowledge of the network, its traffic, and topology. You can just pick a point in the LAN and plug the router in, but most likely, unless you are extremely lucky, you won't see much improvement in the performance of the LAN.


Routers are used to segment fairly large networks, in terms of geography and number of nodes, or very high volume networks. In most cases, you are more likely to segment a LAN with a bridge or switch.


Here are some things to consider before you segment a LAN with a router:


  • A router can segment a LAN that includes different media types. For example, a LAN may have both Category 5 and Thinnet (coaxial) cable connecting to fiber optic cabling.

  • A router can interconnect LANs that are using different protocols, provided they are all routable.

  • A router does increase latency by adding the delay caused by the router examining each packet entirely before sending it on.

  • A router can also provide more than one active link or route to a destination. On a larger LAN, this can provide route diversity and redundancy, which are always good things.

The specific benefits of segmenting with a router


So what are the benefits of using a router to segment a LAN, and why would anyone want to do it? Excellent questions, and ones you're sure to find on the CCNA exam. There are several reasons, including that you simply have money to burn. The real reasons, the ones you should know for the exam, can be summarized as:


  • Reduced size of broadcast domains: Routers block broadcasts unless specifically instructed to forward them.

  • Smaller networks: Routers create smaller networks, as opposed to dividing a large network into smaller pieces of itself.

  • Flexible addressing: Routers segment a network by using logical, rather than physical, addresses. For example, a bridge uses the MAC (Media Access Control) or physical address to make its addressing decisions, whereas the router uses the logical or IP address.

  • Better administration: A system administrator has more management tools available when using a router, thanks to the increased memory in a router and its ability to make routing decisions based on a multitude of factors.

Sunday, August 12, 2007

Top Ten Programs To Download On A Mac

Top Ten Programs To Download On A Mac

We give you a rundown of the best free programs to download on a Mac.

Step 1:
Firefox
Mac OS X comes with Apple's own web browser, Safari and while it's a very good browser, a lot of the internet was designed to run with Microsoft's Internet Explorer instead, so sometimes you'll come across problems getting certain websites to run properly.
Step 2:
Internet Explorer
The simple way around this would be to download Internet Explorer for the Mac - and you can do that at www.microsoft.com/mac. The trouble is, Microsoft stopped fully supporting the Mac version of Internet Explorer back in 2000 and frankly while it's still worth having as a backup, it's now out of date.
A better option is Mozilla's Firefox browser, which you can find at www.mozilla.com/en-US. It's similar to Internet Explorer so it's generally more compatible with the internet than Safari is, and on top of that it's an open source project, which means that it's kept up to date by hundreds of people around the world.
Step 3:
MSN Messenger
OS X also comes with iChat which is Apple's own instant messaging and video chat program. It works with the most popular messaging services (including AOL and Jabber) but it doesn't work with Microsoft's Windows Live Messenger (or MSN Messenger as it used to be known), which many PC owners still use. You can get a Mac version of Microsoft Messenger at www.microsoft.com/mac and while it doesn't have as many features as the PC version, it will let you talk to Windows Messenger users and will also keep on your Hotmail account.
Step 4:
Skype
Another service that replaces iChat is Skype. Again, I'm recommending this as many PC users have it and if you want to talk to them, you're going to need it. You can download it at www.skype.com. If you bought your Mac in 2006 or later, it will have a built in iSight camera for use with iChat, but it can also be used for Skype, which gives you free video chats over the internet and lets you make cheap international phone calls to conventional phones. If you don't have an iSight camera, there's a list of compatible plug-in webcams on the Skype website - and the ability to use plug in cameras is something you won't find in natively iChat.
Step 5:
VLC
OS X's default video player is Quicktime, and while it's pretty good, it can't handle many of the popular video file formats you might come across, so you should download VLC Media Player from www.videolan.org/vlc. This program is not only better at playing video files than Quicktime is, but it'll also cope with almost any file format you throw at it - except for the latest versions or Windows Media and RealPlayer files.
Step 6:
Windows Media Player and Flip4Mac
Windows Media Player. Microsoft stopped supporting the Mac at Media Player number 9 - they're onto version 10 on the PC. You can still download Media Player 9 for the Mac at Microsoft.com/mac but they've also teamed up with software house Telestream to offer their Flip4Mac program for free. Flip4Mac adds Windows Media Support to Quicktime and works well, if a little slowly.
Step 7:
Real Player
The last of our video programs is Real Player, which you can get at uk.real.com/player. While VLC already supports this kind of file, you get better playback and internet video streaming with the standalone program.
Step 8:
Audio Hijack
Audio Hijack lets you record the sound output from pretty much any program running on your Mac. What that means in practice is that you can record internet radio, DVD soundtracks or streaming audio broadcasts and save them to do with as you will. What makes Audio Hijack really special is that only records from one source at a time, so your recording won't be spoilt by system beeps or messenger alerts if they happen. Audio Hijack also features a few tools for improving the sound of poor quality recordings. You can find it at www.rogueamoeba.com/audiohijack. The free version only lets you record 10 minutes of audio, but that's enough for most uses and it is then up to you if you want to spend the £9 or so it takes to get the full version.
Step 9:
Backlight
One area that OS X has always beat Windows in is appearance. Backlight is another tool that will give your desktop the looks to leave Vista users green with envy. Download it from freshsqueeze.com/products/freeware and it will use your current screensaver as you desktop background. It may not sound like much, but having the Flurry or those soothing beach scenes sliding smoothly across your desktop beats dull old wallpaper any day.
Step 10:
Stuffit Expander
OK, I slightly boring one this, but useful none the less. Stuffit Expander is a free program that makes it easier to expand many of the compressed files you'll download from the internet. It used to come bundled with older versions of OS X, and although the internet and Macs in particular are moving towards .Zip and .DMG as a standard for compressed files, Stuffit will come in handy whenever you come across anything different. Get it from www.stuffit.com/mac.


VideoJug: Top Ten Programs To Download On A Mac

How To Clean A Laptop?

How to safely clean your laptop computer.

You Will Need


Step 1:
Clean
Make sure your computer is turned off and unplugged before you start to clean. First we'll blow away any excess surface dust with a can of compressed air. To clean the keyboard, use your cotton buds to remove large particles of dirt between your keys, then blow away smaller particles with the can of compressed air. You can then wipe the surface of the keys with a damp cloth to remove the surface dirt, but ensure that the cloth you use is not excessively damp, as fluid between your keys can damage your computer.
Put a small amount of the cleaning fluid onto a soft cloth and clean the screen using a smooth, continuous motion to help avoid streaks. You may apply a gentle amount of pressure, but make sure you do it evenly and don't press thin objects like a single finger against the screen.
To clean the body of the computer, use a similar method to the screen. Spray your solution onto the cloth and wipe the casing. A continuous motion is not so important here as streaks will not be as apparent here as they will on the screen.
To clean the ports on your computer, carefully wipe the inside of each port with a cotton bud then spray each of them with the compressed air. If you have access to your computer's fan, hold it still with a cotton bud and spray it with compressed air. If you don't hold it, the air will cause it to spin and could break it by making it spin faster than it's motor can cope with.
To clean the CD or DVD drive, open the drawer and spray the compressed air inside. If you can see the laser lens, be careful not to touch it as this can damage it. Commercial CD lens cleaners can also be bought and used to clean this area if your computer is having trouble reading CD's or DVD's.
Now your laptop should be good as new. Done


VideoJug: How To Clean A Laptop,

How Can I transfer music from Rhapsody 4.0 to an iPod?

Can I transfer Rhapsody 4 music to my iPod?

You can use Rhapsody to transfer your own imported MP3 and AAC files to most iPods. Unfortunately, the iPod is not a supported device for any music subscription service, including Rhapsody To Go, and does not support the transfer of tracks purchased from Rhapsody.

To transfer imported tracks to your iPod:

1. Open Rhapsody and sign in.

2. Attach your iPod, and wait for its icon to appear in the Sources area.

3. Drag and drop tracks onto the Apple iPod icon:


Note: If you accidentally drag any subscription tracks onto the iPod, you will be prompted to buy them at this step. Go ahead and cancel this action, because you will not be able to transfer purchased tracks to the iPod.

4. Watch the progress of your transfer in the bar at the bottom of the Display area:


5. When the transfer is complete, right-click the Apple iPod icon and choose Disconnect Device:


6. Disconnect your iPod, and enjoy!

How Can I transfer music from Rhapsody 3.x to an iPod?

What can I transfer from Rhapsody to my iPod?

You can transfer your own MP3 and AAC files to most iPods. You will first need to set up your iPod to work with compatible Rhapsody files. Once that is done, follow the instructions for transferring tracks to a portable device.

Unfortunately, the iPod is not a supported device for any subscription services at this time. Because Rhapsody To Go is a subscription service, you cannot transfer downloaded subscription () tracks or streamed subscription () tracks to an iPod. The iPod is not a supported device for Rhapsody purchased music either.

Why do I get a "Computer Not Authorized" error in Rhapsody 4?

Why do I get the error "Computer Not Authorized: This computer has not been Authorized to play Rhapsody subscription tracks. To Authorize, Select My Account > Authorize Computer from the Rhapsody Menus"?

When you attempt to play streamed subscription tracks in Rhapsody 4, or transfer them to a portable MP3 player, you may receive this error, even though your computer is authorized:
Computer Not Authorized -- This computer has not been authorized to play Rhapsody subscription tracks. To authorize, Select My Account > Authorize Computer from the Rhapsody menus.

Try the following solutions, attempting playback or transfer again after each one. You don't have to do all of these. If the first doesn't work, try the next, until you find your solution.

Solution 1: Check if you are signed in and your computer is authorized.

Double-check that you are signed in and your computer is authorized.

Solution 2: Download the track before you transfer it.

If the issue occurs when you try to transfer a streamed track to a portable device, download the track first:

1. Right-click on the streamed subscription track in My Library and select Download Tracks.


This changes the track to a downloaded subscription track.

2. Drag and drop the downloaded subscription track(s) to your device.

Solution 3: Troubleshoot your Helix Components.

This involves deleting your Helix Licenses and then, if necessary, updating Helix Components.

Solution 4: Run the Windows Media Security Component Upgrade.

The Windows Media Security Component Upgrade works only on Windows XP & 2000 operating systems. Do not perform this step if you have Windows 98 or Windows ME.

Solution 5: Rename the DRM folder.

The Windows DRM folder contains licenses for secure media files such as your Rhapsody tracks. Renaming the DRM folder can help fix these licenses.

Rhapsody installation freezes at 99%?

I tried to install Rhapsody, but it stopped. When I looked, it said it was 99% complete. Why?

The Rhapsody installation may freeze at 99% and never complete the installation. This can occur if Rhapsody access to the Internet is blocked, or there is a problem installing the Digital Rights Management (DRM) components.

To resolve, try the following solutions, attempting the installation again after each one. You don't have to do all of these! If the first doesn't work, try the next, until you find your solution.

Solution 1: Reset your Internet Explorer settings and configure your firewall to allow Rhapsody Internet access.

Follow the steps in Trouble installing, signing in, or connecting? Check this software, then try installing Rhapsody again.

Solution 2: Set Internet Explorer to automatically detect settings.

1. Open Microsoft Internet Explorer.
2. Click the Tools menu, then choose Internet Options.
3. Click the Connections tab.
4. Click the LAN Settings button. The Local Area Network (LAN) Settings window opens.
5. Check the Automatically detect settings box.
6. Click OK twice.
7. Close Internet Explorer, and try to install Rhapsody again.

Solution 3: Close other programs on your computer.

Try improving performance by closing all other open applications and programs running in the background.

Solution 4: Remove Internet Explorer cookies and temporary files.

Follow these steps, then try installing Rhapsody again.

Solution 5: Update your Windows Components.

1. Close out of Rhapsody, Windows Media Player, Internet Explorer, and any other open programs.
2. Update your Windows Components (for Windows XP & 2000 operating systems only. Do not perform this step if you have Windows 98 or Windows ME). Once you have done these steps, try again.

Solution 6: Uninstall, then reinstall Windows Media Player 10.

Click here for instructions. Once you have done these steps, try installing Rhapsody again.

Solution 7: Rename the DRM folder.

The Windows DRM folder contains licenses for secure media files such as your Rhapsody tracks. Renaming the DRM folder can help fix these licenses. Once you have done these steps, try installing Rhapsody again.

Solution 8: Troubleshoot your Helix Components.

This involves deleting your Helix Licenses and then, if necessary, updating Helix Components. Once you have done these steps, try installing Rhapsody again.

Solution 9: Update to the latest Rhapsody version.

1. Launch and log in to Rhapsody.
2. Select Help > Check for Updates.
3. Follow the prompts to update to the latest version of Rhapsody.

Getting "unable to install required components", "DRM", or "WMDRM" errors when you update Rhapsody?

Rhapsody invited me to upgrade and now I'm getting one of the following errors:
- "Unable to install required components"
- "Rhapsody was unable to acquire needed DRM information from the computer"
- "WMDRM corrupt"


To resolve this issue, please follow the instructions for your operating system:

Windows 2000
Rhapsody 4.0.2.154 is not compatible with your operating system. However, we have released a new build, Rhapsody 4.0.2.160 that is compatible. Please uninstall Rhapsody and install the latest version using the instructions below.

1. Click the Windows Start button and point to Settings > Control Panel (In Windows XP: Start > Control Panel ).
2. Click Add or Remove Programs.
3. Find and select Rhapsody from the list of programs.
4. Click the Change/Remove button.
5. Follow the on-screen prompts.
6. If you get a prompt that Rhapsody has already been removed, click OK.
7. Go to http://www.rhapsody.com/-software to download the latest version of Rhapsody.

Windows XP Service Pack 1
Please update to Service Pack 2. Then run the updates for Windows XP Service Pack 2 including Windows Media Player 11.

1. Open Internet Explorer
2. Click Tools > Windows Update
3. Follow the onscreen prompts.
4. Once Microsoft has determined what updates you need, it will present you with a list of available updates. Ensure Service Pack 2 is selected.
5. Allow Windows to update. Once it has finished updating, it will prompt you to restart.
6. After your computer reboots, perform the above steps again for ALL Windows Updates. Make sure to install Windows Media Player 11.
7. Install Rhapsody again.

Windows XP Service Pack 2
Update to Windows Media Player 11, then run the updates for Windows XP Service Pack 2.

1. Open Internet Explorer
2. Click Tools > Windows Update
3. Follow the onscreen prompts.
4. Once Microsoft has determined what updates you need, you will see a list of available updates. Ensure that Windows Media Player 11 is selected.
5. Allow Windows to update. Once it has finished updating, it will prompt you to restart.
6. After your computer reboots, perform the above steps again for ALL Windows Updates before installing Rhapsody again.

If you still receive DRM errors when trying to install
If you still receive DRM errors when trying to install after updating your operating system, try the article applicable to your error below:

Rhapsody is unable to install required components from the Rhapsody server
'Windows Media Licenses (WMDRM) are corrupt' error
'Could not get the DRM info, cannot log in' error when starting Rhapsody

How do I transfer music from Rhapsody 4 to my device?

How do I transfer music from Rhapsody 4 to a portable device or MP3 player like the Sansa e200R Rhapsody?

In brief: drag and drop tracks, albums, album cover images, and playlists onto the image of your MP3 player in the Sources area of Rhapsody 4. We use the Sansa e200R Rhapsody in the example below.

Before you start: If you have a Rhapsody To Go subscription and a compatible portable device, any streamed Rhapsody tracks you drag to your device will be automatically downloaded. If you do not have a Rhapsody To Go subscription, or if any of the tracks are unavailable for download without purchase, the "Purchase" dialog will open. Please see What types of files can I transfer from Rhapsody 4 to my Rhapsody MP3 Player? for details.

1. Open Rhapsody and sign in.

2. Attach your device to your computer.

3. After you see the device appear in the Sources area, drag and drop tracks onto the device icon. When tracks are being transferred from My Library, it looks like this:


4. The progress of your transfer is shown in the bar at the bottom of the Display area:


5. When the transfer is complete, right-click the device icon and choose Disconnect Device:


Note: If you get a Rhapsody was unable to disconnect your device error, use the Microsoft utility called Unplug or Eject Hardware or Safely Remove Hardware, visible in the lower-right corner of your computer screen.

For more details, check out the Transfer Tracks to a Portable Device Help topic, which includes a Flash movie and text instructions on manually transferring tracks and playlists to your portable device, as well as a Flash movie and text instructions on setting up Library Transfer (like synching, it means transferring your entire Rhapsody library to your device).

Note: In Rhapsody 3, the Mixer was used to transfer tracks to a portable device.

Saturday, August 11, 2007

Configuring WEP or WPA Encryption on a Networked Mac

You can set up either WEP (Wireless Encryption Protocol) or WPA (Wi-Fi Protected Access) encryption to make your wireless network more secure. WPA encryption is much more secure than WEP encryption. You should use WPA-PSK or WPA Personal encryption on your home wireless network unless you have computers that only support WEP encryption.


Setting up WEP encryption


Use the following steps to set up WEP encryption on a Mac:


1. Choose Apple --> System Preferences to open the System Preferences window.


2. Click the Network icon to open the Network dialog box.


3. Choose AirPort in the Show menu and choose Preferred Networks in the By Default, Join menu.


4. Select a network in the list of networks and click Edit.


5. In the Wireless Security menu, choose a WEP option. Choose ASCII or HEX as appropriate for your network.


If you're not sure whether to choose ASCII or HEX, or if your network uses 64-bit WEP encryption, choose WEP Password instead.


6. Enter the WEP key in the password text box.


7. Click OK and then quit Network Preferences.


To make sure you're typing the WEP key correctly, temporarily select the Show Password check box so that you can see the characters you are typing. Make sure no one is looking over your shoulder when you do this.


Configuring WPA encryption


Follow these steps to configure WPA encryption:


1. Choose Apple --> System Preferences to open the System Preferences window.


2. Click the Network icon to open the Network dialog box.


3. Choose AirPort in the Show drop-down menu and choose Preferred Networks in the By Default, Join menu.


4. Select a network in the list of networks and click Edit.


5. In the Wireless Security menu, choose WPA Personal.


WPA Personal is equivalent to WPA-PSK, which is used by many wireless access points. WPA Enterprise requires that a RADIUS server be running on your network, something your home network is not likely to have.


6. Enter the WPA password in the password text box.


7. Click OK and then quit Network Preferences.

Special Wi-Fi Considerations for Macs

Macintosh computers have been at the forefront of wireless networking with AirPort, Apple's name for the Wi-Fi technology used in modern Macs. Most new Macs have AirPort Extreme — a newer, faster version of AirPort — built right in. If you buy a new Mac without AirPort Extreme you may be able to install a card. By using AirPort or AirPort Extreme, you can connect your Mac to any 802.11b/g Wi-Fi network.


Some Macs —such as the Mac mini — can only be upgraded by an Apple repair professional. When you buy a new Mac, spend a little extra money to get an AirPort Extreme card preinstalled — it's worth it.


Installing an AirPort card in an iBook


Follow these steps to install an AirPort card in an iBook:


1. Shut down your iBook and remove the battery.


To remove the battery, use a coin to turn the lock screw on the bottom of the iBook to the unlocked position.


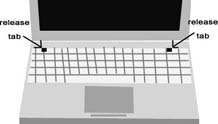
2. On the front of your iBook, push the keyboard release tabs (see Figure 1) towards the front of the iBook and gently lift the keyboard out of the chassis. You don't need to disconnect the keyboard; simply rest it upside down on the touch pad.


Figure 1: The keyboard release tabs.

3. Locate the built-in AirPort antenna in the space provided for the AirPort card.


If you don't see a space for the AirPort card, your iBook either is not compatible with AirPort or it already has AirPort installed.


4. Connect the antenna to the antenna port on the AirPort card.


5. Insert the AirPort card into the slot, ensuring that the connector pins seat firmly in the AirPort card socket.


Do not force the card into position. If the AirPort card and the port on your computer don't match, you probably have the wrong kind of card for your iBook model.


6. Seat the AirPort card wire retention clasp and replace the keyboard and battery.


Installing an AirPort card in an eMac


Follow these steps to install an AirPort card in an eMac:


1. Open the DVD-ROM disc tray and leave it open.


2. Shut down your computer and make sure that the power is off.


Disconnect the power cable to make sure that the computer doesn't accidentally turn on while you are installing the card.


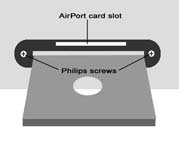
3. Remove the two Philips-head screws on the cover inside the disc tray to reveal the AirPort card slot (see Figure 2).


Figure 2: The AirPort card slot.

4. Disconnect the antenna from the cover and then press the antenna into the AirPort card's antenna port.


5. Insert the AirPort card firmly into the slot until it seats and then reinstall the cover inside the disc tray.


Connecting to a Wi-Fi access point


To connect to a Wi-Fi access point, follow these steps:


1. If AirPort isn't already enabled, click the AirPort icon on the menu bar in the upper-right corner of the screen and choose Turn AirPort On.


2. Click the AirPort icon in the menu bar again and choose Other to connect to a new Wi-Fi network.


If the access point is set to broadcast its SSID, it may appear in the list of available networks in the AirPort menu. If you see the network to which you want to connect listed, click its name.


3. In the resulting Closed Network dialog box, enter the network's SSID in the Network Name text box.


4. Choose a Wireless Security method as needed for the network.


5. Click OK to connect to the network.


6. Check the status and signal strength of the Wi-Fi network by clicking the AirPort icon in the menu bar and choosing Open Internet Connect.


Managing Wi-Fi networks


Follow these steps to manage your Wi-Fi network:


1. Choose Apple --> System Preferences to open the System Preferences window.


2. Click the Network icon to open the Network dialog box.


3. Choose AirPort in the Show menu to reveal AirPort settings.


4. In the By Default, Join menu, choose Preferred Networks.


5. In the resulting list, rearrange the order by clicking and dragging networks up or down in the list.


6. To remove a network from the list, click the network to select it and then click the Remove (-) button.


7. Select a network and choose Edit to change encryption keys and other network details for a given network.


8. When you are done making changes, click the Apply Now button and then quit System Preferences.


To update the AirPort software, choose Apple --> Software Update to run the Software Update. Download and install any necessary updates to your computer.


Amazon