Thanks to a new breed of affordable and easy-to-use Wi-Fi-equipped cameras, setting up a home security camera is easy. You can position a Wi-Fi camera anywhere within range of your Wi-Fi network. You can then monitor the camera and record video from it using any computer on your network. You can even set up a special computer just for recording security video if you want. The computer can be an older unit that you don't use much anymore, so long as it has a lot of free hard drive space.
 | The exact steps you follow when setting up your security camera may be different from the steps listed here, depending on the brand of camera you buy. However, the general concepts should be the same. |
Choosing a wireless camera
Consider the following when choosing a wireless camera:
1. Choose a camera that is compatible with 802.11b or 802.11g Wi-Fi networks.
Many security cameras are marketed as wireless security cameras, however they utilize a proprietary radio for wireless transmission rather than 802.11 Wi-Fi. If the camera doesn't specifically say that it is compatible with Wi-Fi networks, it may not work with your network.
2. Determine whether you need a weatherproof camera.
 | Weatherproof cameras tend to be more expensive, but they allow you to safely monitor outdoor areas. Also, be aware that if the camera was designed for indoor use, its sensor can be damaged by direct exposure to sunlight. |
Installing the camera
To install the camera, follow these steps:
1. Connect an Ethernet cable between the camera and your router or a computer.
| A temporary Ethernet connection is usually required during setup. You can reconfigure the camera to work wirelessly later. |
2. Connect the camera's power cable and power on the camera.
3. Install the camera's software.
4. Write down the following pieces of information for your network:
• The router IP address, subnet mask, and default gateway
• SSID
• Encryption format and keys
5. Configure the camera's software for your network (see Figure 1).
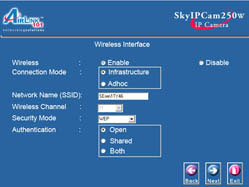
Figure 1: Configure the camera for your network.
6. When configuration is complete, disconnect the Ethernet cable and test the camera to make sure that it works wirelessly.
7. Move the camera to its permanent position, mount it, and test the wireless connection again.
| If the camera gets poor or no Wi-Fi reception, move it to a different position. If you need more Wi-Fi range, consider adding a Wi-Fi repeater to your network. |
Setting up a computer to record video
Follow these steps to set up a computer to record video:
1. Install the camera recording software on a computer with lots of free hard drive space.
| Web and security cams typically record at a resolution of 320x240 pixels. At this resolution, you can expect to need about 200–220 MB for every hour of recorded video, or 5–6 GB per day. Higher resolution cameras use exponentially more storage space. |
2. Disable power-saving settings on the recording computer.
If the computer's hard drive or processor automatically shuts down after a period of computer inactivity, it won't be able to record video from the wireless camera.
3. Launch the camera's recording software and open the configuration window.
4. Locate the motion detection controls and activate them if desired.
5. Adjust motion sensitivity.
6. If possible, create detection regions.
7. Choose notification options for motion detection.
8. Open the recording configuration screen.
9. Set the amount of disk space you want reserved for the Windows operating system (OS).
| It is a good idea to leave at least 30–40 percent of your hard drive open at any given time. This vastly improves the performance of Windows and your computer. |
10. Set the maximum file size for each recorded video file.
11. Choose a storage location for the video files.
12. Choose whether or not you want to recycle storage space.
13. If you want to record video at a scheduled time every day, open the scheduling page and create a recording schedule.
14. Save your configuration changes and close the configuration screen.
15. Click the Record button and activate recording.
Replaying recorded video
Use these steps to replay recorded video:
1. Open the camera's recording utility.
2. Open the playback control panel.
3. Open the folder containing files from your camera.
4. Select the file you want to play and click OK.
5. Play the file in your media player
No comments:
Post a Comment